Connect Plugin
Easily request Authorization to connect to a Shout Account from your own website or application
The Connect Plugin is the easiest way for any organization to request Authorization to a Shout Account from their own website or application. It provides a prebuilt interface that you can install in any environment capable of rendering html and javascript (almost all browsers and websites). If you can add Facebook Pixel or Google Analytics tags, you can easily add the Connect Plugin.
Contents
How the Connect Plugin Works
Shout creates a customizable Connect Plugin for each Shout Connect Account. When someone visits a page where the plugin is installed, the plugin detects whether the visitor is currently logged into a Shout account in the same browser (not necessarily the same window) using a cookie and then prompts the user to connect their Shout account with your organization. You will provide the connect_id for that visitor to the plugin so that Shout Connect can link the visitor to the correct account of your website. If the visitor is not logged into a Shout account it prompts them to login or create an account first.
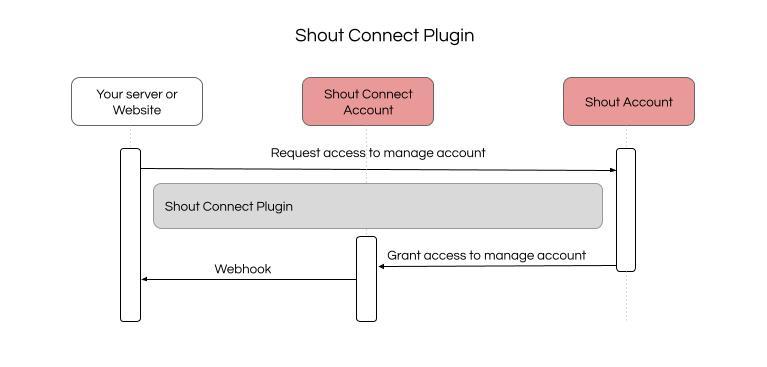
Create a User Mapping with the Connect Webhook
For large integrations with many affiliates and distributors, creating a user mapping is important to ensuring that Shout Connect stays responsive and performant. A user mapping is simply tracking which affiliates in your database have connected to your organization's Shout Connect account. This mapping can be used to promote the integration to those affiliates that have not yet connected and can be checked prior to sending api calls to the Shout API. If a user has not connected, simply do not send the API call.
Shout Connect provides a webhook that you can listen to for two events: 1) api_client_granted_user_created, and 2) api_client_granted_user_deleted. The first event is sent when a Shout user "connects" or authorizes your Shout Connect account. The second event is sent when a Shout user "disconnects" or revokes authorization to your Shout Connect account.
If you're not familiar with webhooks, you simply provide the url to an endpoint on your servers. Each time that a Shout account authorizes your Connect Account, Shout will post to your endpoint with a payload that contains the information that you need to save the Shout User Id to your database associated with the unique id that you use for the user (the Connect Id). For example, if you have an affiliate with the id of 123abc when they connect to your Shout Connect account, Shout will send a webhook with the Shout User Id of 112233. You'd then save that id to your database to create your mapping.
To configure the Shout Connect Webhook and ensure that you are listening for the correct events and payloads, follow these instructions:
- Login to your Shout account and navigate to your Shout Connect services Page by clicking on Settings > Services > Shout Connect. If the page is not visible contact Shout support to have it enabled on your account.
- Click the "Manage" button next to the Company name and click "Webhook Config".
- Update the form fields that you would like to customize. At the time of writing this article, you can customize the Webhook URL, Basic Auth Username (optional), and the Basic Auth Password (optional).
- Copy the payloads that are sent to the Webhook URL so you can test and ensure that you are correctly listening for the events and updating your database (and user mapping) accordingly.
Connect Plugin States
The Connect Plugin has multiple states that it will display based on the whether the user is logged into Shout in the same browser and whether the connect_id provided to it is already associated with a Shout Account connected to your organizations Shout Connect account.
Plugin State: Visitor is not logged into Shout or does not have a Shout account
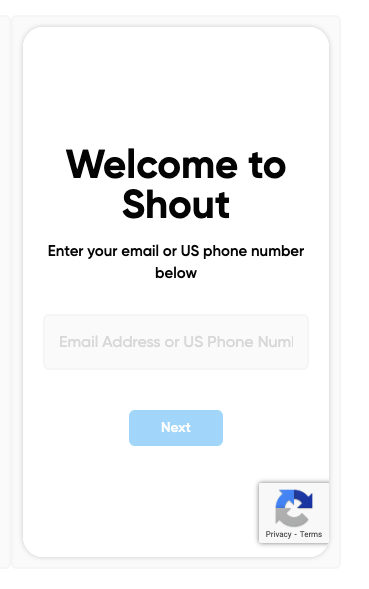

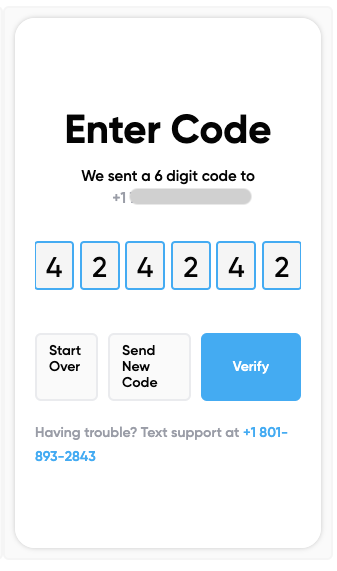
If the visitor to the page is not already logged into Shout in the same browser window, they'll be prompted to login or create a Shout account. The user can login or create an account right through the plugin without navigating directly to Shout.
Plugin State: User is logged into Shout and has not authorized the Connect Account
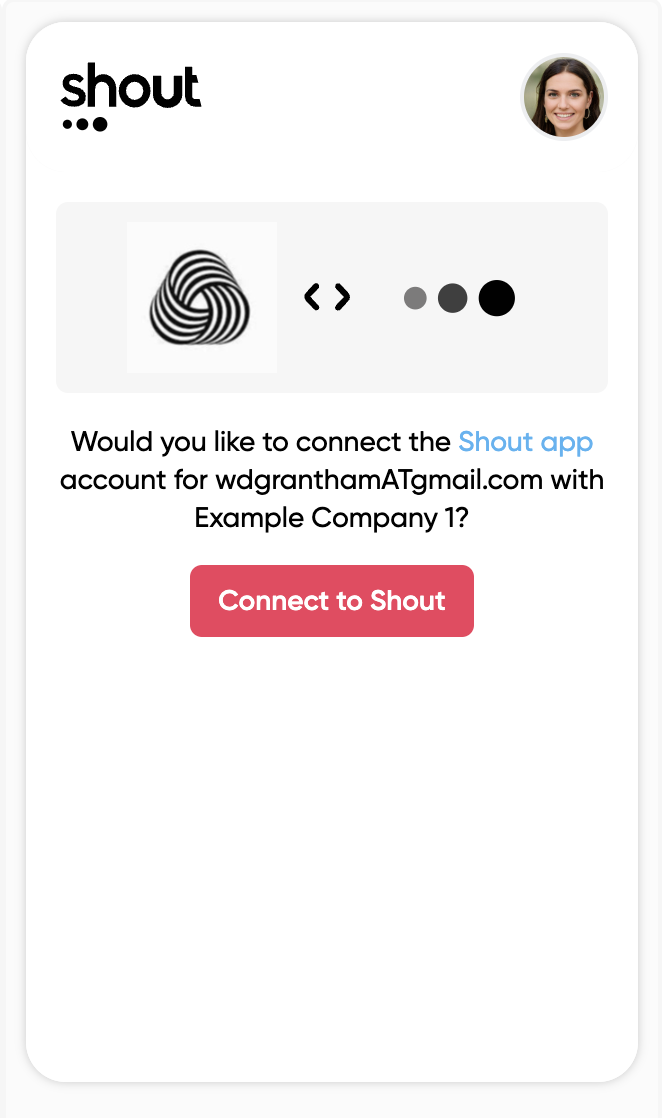
If the visitor to the page is logged into Shout in the same browser, the user may click the “Connect” button to authorize the back office to connect to Shout Connect account. After the User authorizes the connection, the Shout Connect account and any associated API Client will now be authorized to interact with the User’s Shout account and Shout will post an api_granted_user_created event to any configured webhooks.
Plugin State: Visitor is logged into Shout and already authorized the Connect Account
As of the writing of this guide, once a visitor has authorized the Connect Account, they will be shown the specific features and settings configured in the Connect Account. There are two specific features that a Connect Account can enable in the Connect Plugin: "Chat with Team" and "Text with Customers". Refer to the specific guides for enabling this each feature:
Guide: Enable Connect Group ChatsGuide: Enable Connect Orders & Texting
No Features Enabled
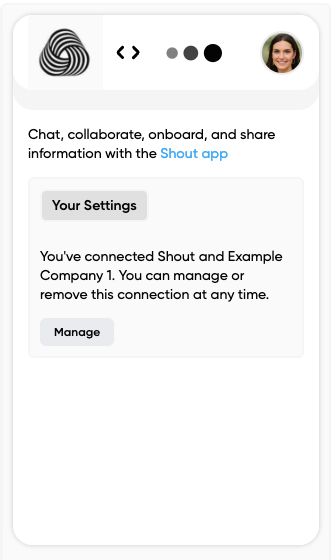
If there are no features enabled on the plugin, the plugin shows that the Shout Account is connected and provides a link to the Shout web application to manage the connection.
Connected Chat Enabled
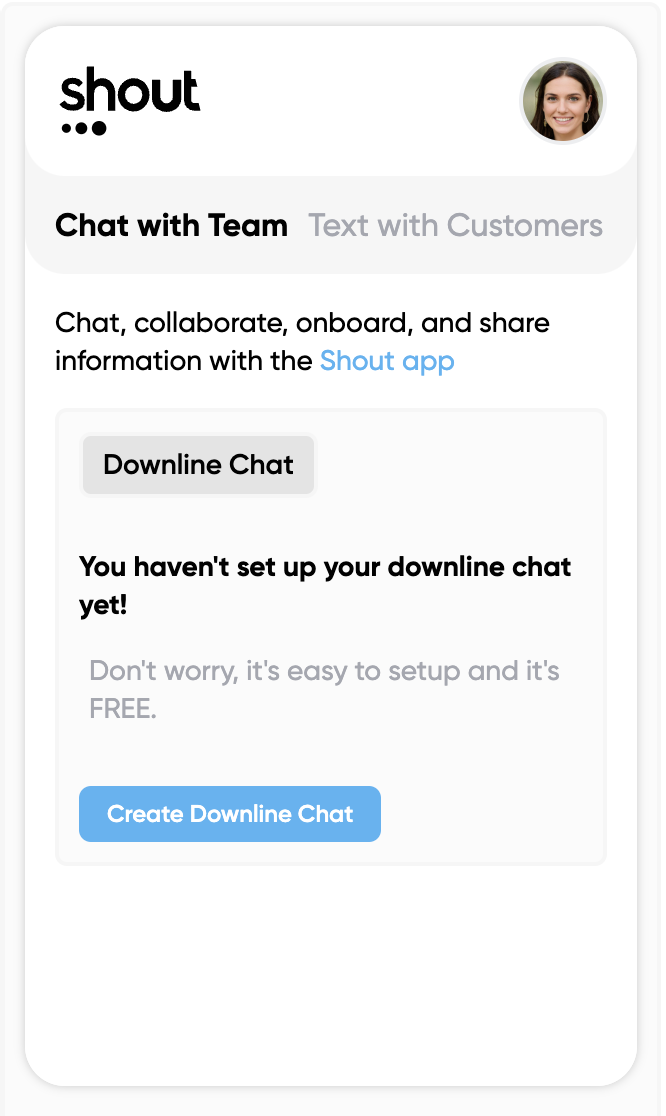

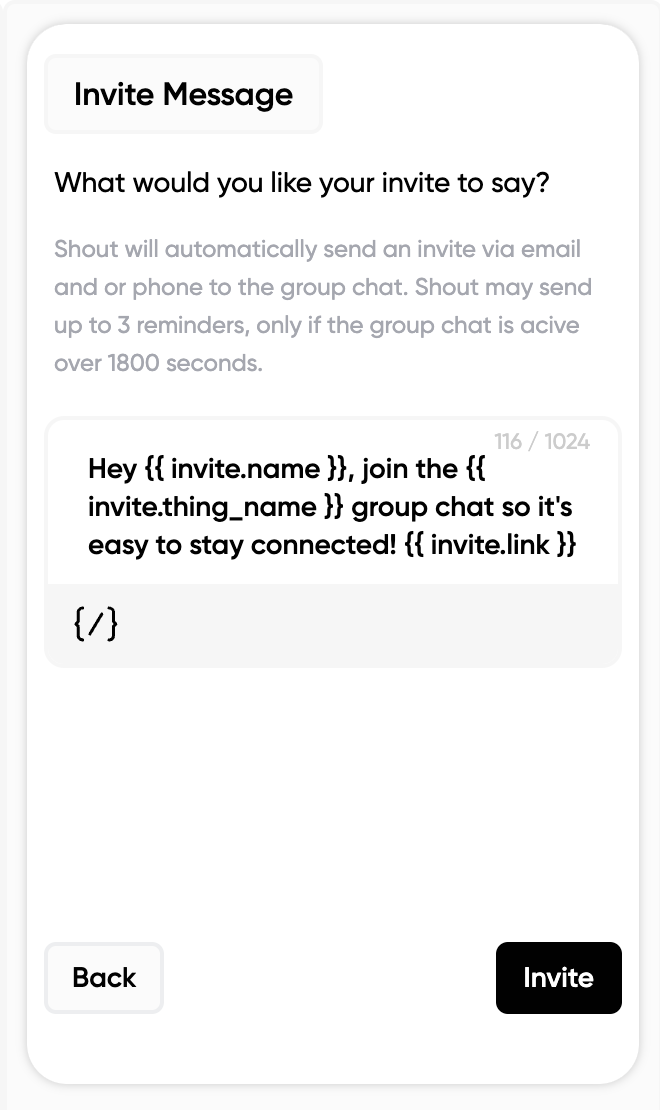

If Connected Chat is enabled in the plugin, the plugin displays the Connect Chat tab. This tab allows the visitor to create a Team Group Chat and invite the members of their team to join the Group Chat. It also allows visitors to easily join the group chat created by their team leader.
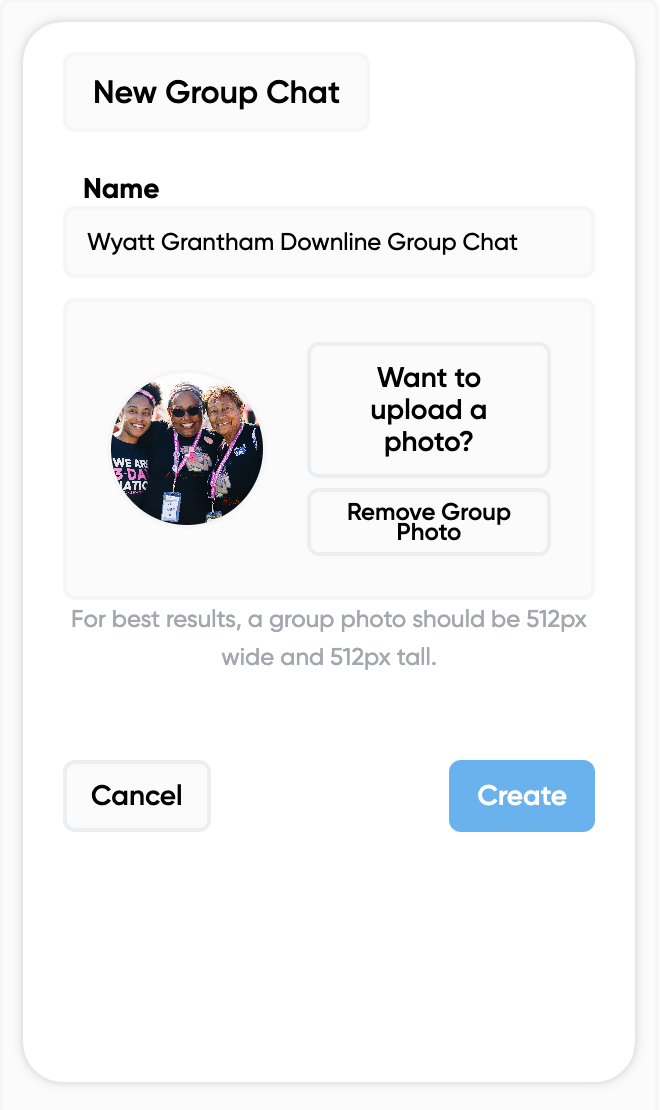
When a user clicks the “Create Downline Chat”, Shout displays the team of the user, and prompts the user to select which members of their team they would like to invite. Shout will then create invites and email and text invites to the team member to join the chat on Shout. The user can customize the invite language before sending. Upon creating the Chat the user may then turn on the setting to “Invite new teammates”.
If the sponsor or team leader has created a downline chat, the user may click “Join Chat” to open Shout in the web browser or on their mobile application (if installed) and automatically join the chat. Each team leader or sponsor can customize the features used in their team group chat on Shout.
Connected Orders and Texting
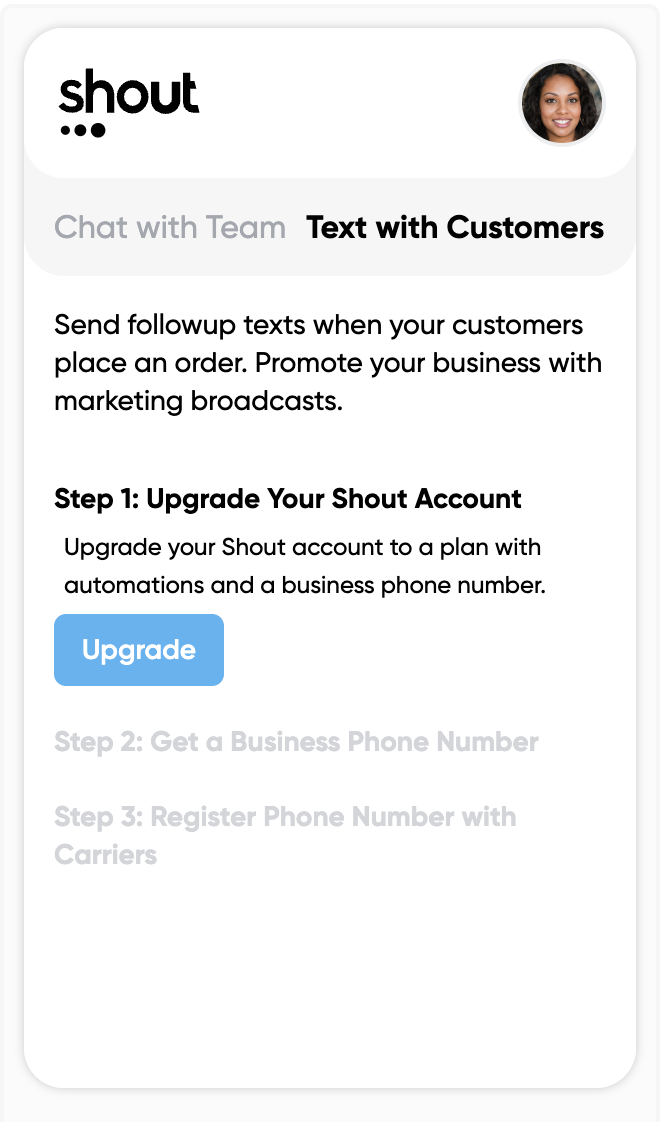
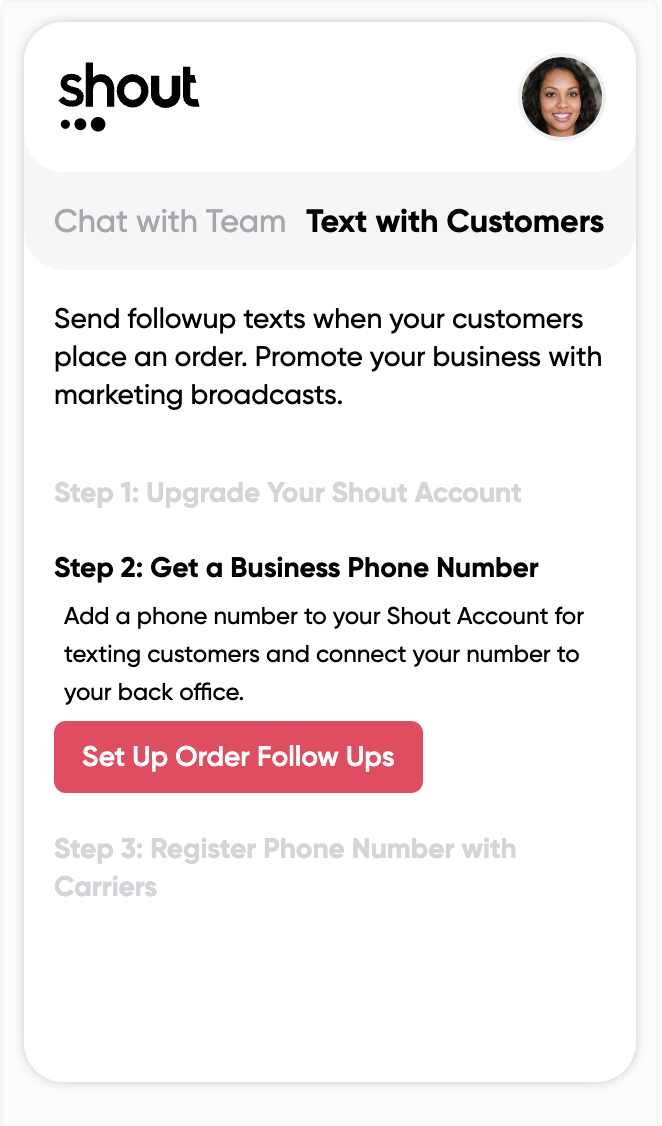
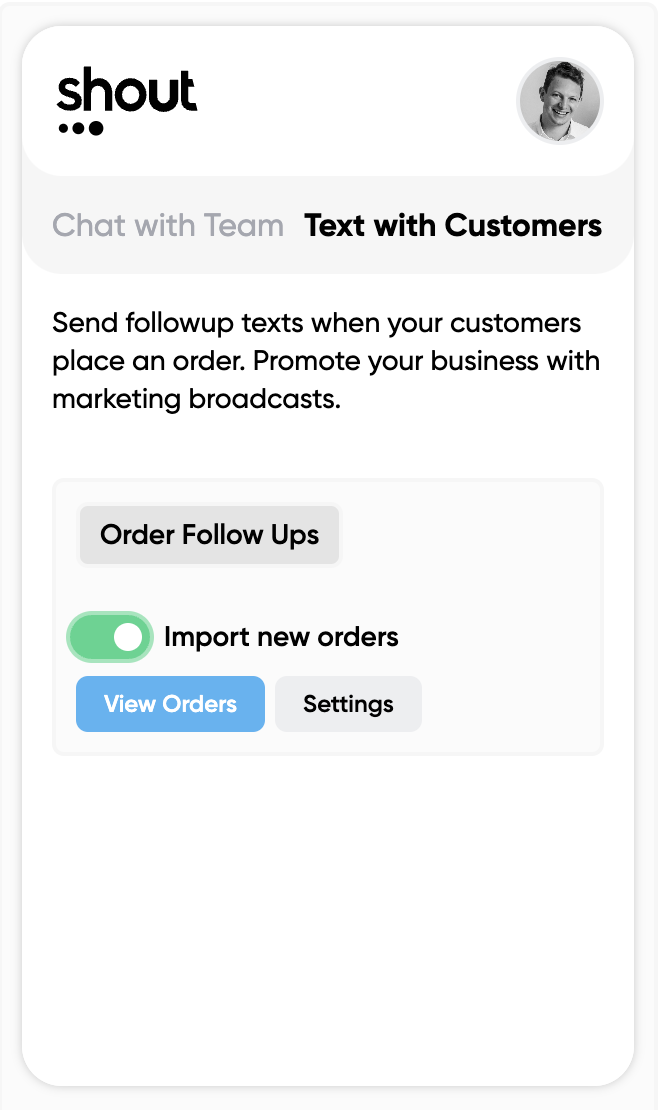
If Connected Orders and Texting is enabled in the plugin, the plugin displays the Connect Orders tab. This tab allows the visitor to explicitly authorize the Shout Connect Account to create orders in the account and prompts the user to add a business phone number to their Shout account so that they can send text messages from the account.
Once the feature is set up by the user, the user may then configure their Shout account to automatically send order alerts and followups from their Shout phone number. Each time an order is created in their account, it will also automatically add the customer to their Shout account's contacts for future messaging such text marketing promos.
This functionality requires a paid subscription to Shout, and Shout will prompt the user to upgrade their Shout subscription, add a business phone number to their Shout account, and register their phone number with the U.S. telecommunications carriers. Upgrades should be encouraged in order to improve the customer experience by connecting the customer directly to the seller to facilitate follow-ups, purchase satisfaction confirmations, and repeat purchases.
The Shout Connect account can customize the default text order alert message. Shout user's can then personalize the alert text that is sent from their account to their customer's via text message.
Preview the Connect Plugin
Because a Connect Plugin is customized based on the viewer of the page, you'll need to follow these instructions for previewing and testing the Connect Plugin:
- Login to your Shout account and navigate to your Shout Connect services Page by clicking on Settings > Services > Shout Connect. If the page is not visible contact Shout support to have it enabled on your account.
- Click the "Manage" button next to the Company name and click Connect Plugin Preview.
- Enter the Connect Id for the user that you'd like to preview the plugin for and click "Start Preview".
Steps to Customize the Connect Plugin
You can easily customize the Simple connect page following the steps below:
- Login to your Shout account and navigate to your Shout Connect services Page by clicking on Settings > Services > Shout Connect. If the page is not visible contact Shout support to have it enabled on your account.
- Click the "Manage" button next to the Company name and click Edit.
- Update the form fields that you would like to customize. At the time of writing this article, you can customize the name, logo, and the enabled features of your Shout Connect account. We'll add additional customizations over time as requested.
Install the Connect Plugin
Installing the connect plugin requires you to have access to the HTML of your website. Shout provides detailed instructions for installing the plugin. Access those instructions by following these steps:
- Login to your Shout account and navigate to your Shout Connect services Page by clicking on Settings > Services > Shout Connect. If the page is not visible contact Shout support to have it enabled on your account.
- Click the "Manage" button next to the Company name and click Connect Plugin Setup.
- Read the instructions and copy the code snippets found there. A guide dedication to installing and troubleshooting issues with the plugin is found here.