Simple Connect Page
The simplest way to request authorization to connect to a Shout Account
The Simple Connect Page is the easiest way for any organization to get started using Shout Connect. It provides a prebuilt interface where you can send everyone in your organization to create and connect their Shout account.
Contents
How the Simple Connect Page Works
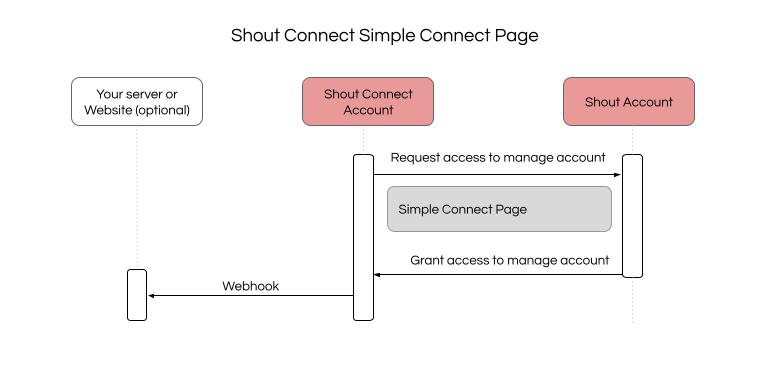
Shout creates a customizable Simple Connect Page for each Shout Connect Account. When someone visits the Simple Connect page it detects whether the visitor is currently logged into a Shout account and then prompts them to connect their Shout account with your organization. If the visitor does not have a Shout account the page prompts them to login or create an account first.
Create a User Mapping with the Connect Webhook
For large integrations with many affiliates and distributors, creating a user mapping is important to ensuring that Shout Connect stays responsive and performant. A user mapping is simply tracking which affiliates in your database have connected to your organization's Shout Connect account. This mapping can be used to promote the integration to those affiliates that have not yet connected and can be checked prior to sending api calls to the Shout API. If a user has not connected, simply do not send the API call.
Shout Connect provides a webhook that you can listen to for two events: 1) api_client_granted_user_created, and 2) api_client_granted_user_deleted. The first event is sent when a Shout user "connects" or authorizes your Shout Connect account. The second event is sent when a Shout user "disconnects" or revokes authorization to your Shout Connect account.
If you're not familiar with webhooks, you simply provide the url to an endpoint on your servers. Each time that a Shout account authorizes your Connect Account, Shout will post to your endpoint with a payload that contains the information that you need to save the Shout User Id to your database associated with the unique id that you use for the user (the Connect Id). For example, if you have an affiliate with the id of 123abc when they connect to your Shout Connect account, Shout will send a webhook with the Shout User Id of 112233. You'd then save that id to your database to create your mapping.
To configure the Shout Connect Webhook and ensure that you are listening for the correct events and payloads, follow these instructions:
- Login to your Shout account and navigate to your Shout Connect services Page by clicking on Settings > Services > Shout Connect. If the page is not visible contact Shout support to have it enabled on your account.
- Click the "Manage" button next to the Company name and click "Webhook Config".
- Update the form fields that you would like to customize. At the time of writing this article, you can customize the Webhook URL, Basic Auth Username (optional), and the Basic Auth Password (optional).
- Copy the payloads that are sent to the Webhook URL so you can test and ensure that you are correctly listening for the events and updating your database (and user mapping) accordingly.
Steps to Customize the Simple Connect Page
You can easily customize the Simple connect page following the steps below:
- Login to your Shout account and navigate to your Shout Connect services Page by clicking on Settings > Services > Shout Connect. If the page is not visible contact Shout support to have it enabled on your account.
- Click the "Manage" button next to the Company name and click Edit.
- Update the form fields that you would like to customize. At the time of writing this article, you can customize the name, logo, and the enabled features of your Shout Connect account. We'll add additional customizations over time as requested.
Preview the Simple Connect Page
Because a simple connect page is customized based on the viewer of the page, you'll need to follow these instructions for viewing and testing the Simple Connect Page:
- Login to your Shout account and navigate to your Shout Connect services Page by clicking on Settings > Services > Shout Connect. If the page is not visible contact Shout support to have it enabled on your account.
- Click the "Manage" button next to the Company name and click Connect Page Preview.
- Enter the Connect Id for the user that you'd like to preview the page for and click "Start Preview".
Create Direct Links to the Simple Connect Page
You can easily create direct links to the Simple Connect Page for each person in your organization with the following instructions:
- Login to your Shout account and navigate to your Shout Connect services Page by clicking on Settings > Services > Shout Connect. If the page is not visible contact Shout support to have it enabled on your account.
- Copy the UID for your Shout Connect account from the page
- For each member of your organization you'll create the link as follows: https://www.shout.app/p/
{{ insert connect UID }}/widget_start?connect_id={{ insert connect id }} - Send the link to each member of your organization. It should look like this:
https://www.shout.app/p/boc_1xq99sqr4gkf9evkdz7m1wcnzkin/widget_start?connect_id=123