Shout Connect provides easy to use interfaces in Shout or use API credentials to use Shout Connect programatically
Once you've obtained authorization to manage Shout accounts through Shout Connect, Shout connect becomes a powerful, effective tool for managing, streamlining, and standardizing communication throughout your organization.
Shout connect allows an organization to quickly and easily get authorization to manage connected Shout accounts. This in turn facilitates managing the communication with a connected account and on behalf of the connected account. There are three types of messages that are facilitated between a Shout Connect Account of your organization and the Shout Account that has granted authorization: a) announcement, b) message, and c) notification. The Shout Connect account can also create orders on behalf of the connected account, manage group chat memberships, and create messages on behalf of the connect account. In addition, Shout Connect provides the ability to configure connected accounts and easily share content for onboarding and automatically handle offboarding as well. In this article, we'll explain how to use Shout Connect for each of these use cases. Have other use cases? Let us know and we'll add them to this article as well.
Create a User Mapping with the Connect Webhook
For large integrations with many affiliates and distributors, creating a user mapping is important to ensuring that Shout Connect stays responsive and performant. A user mapping is simply tracking which affiliates in your database have connected to your organization's Shout Connect account. This mapping can be used to promote the integration to those affiliates that have not yet connected and can be checked prior to sending api calls to the Shout API. If a user has not connected, simply do not send the API call.
Shout Connect provides a webhook that you can listen to for two events: 1) api_client_granted_user_created, and 2) api_client_granted_user_deleted. The first event is sent when a Shout user "connects" or authorizes your Shout Connect account. The second event is sent when a Shout user "disconnects" or revokes authorization to your Shout Connect account.
If you're not familiar with webhooks, you simply provide the url to an endpoint on your servers. Each time that a Shout account authorizes your Connect Account, Shout will post to your endpoint with a payload that contains the information that you need to save the Shout User Id to your database associated with the unique id that you use for the user (the Connect Id). For example, if you have an affiliate with the id of 123abc when they connect to your Shout Connect account, Shout will send a webhook with the Shout User Id of 112233. You'd then save that id to your database to create your mapping.
To configure the Shout Connect Webhook and ensure that you are listening for the correct events and payloads, follow these instructions:
Login to your Shout account and navigate to your Shout Connect services Page by clicking on Settings > Services > Shout Connect. If the page is not visible contact Shout support to have it enabled on your account.
Click the "Manage" button next to the Company name and click "Webhook Config".
Update the form fields that you would like to customize. At the time of writing this article, you can customize the Webhook URL, Basic Auth Username (optional), and the Basic Auth Password (optional).
Copy the payloads that are sent to the Webhook URL so you can test and ensure that you are correctly listening for the events and updating your database (and user mapping) accordingly.
Onboarding and Configuring Connected Accounts
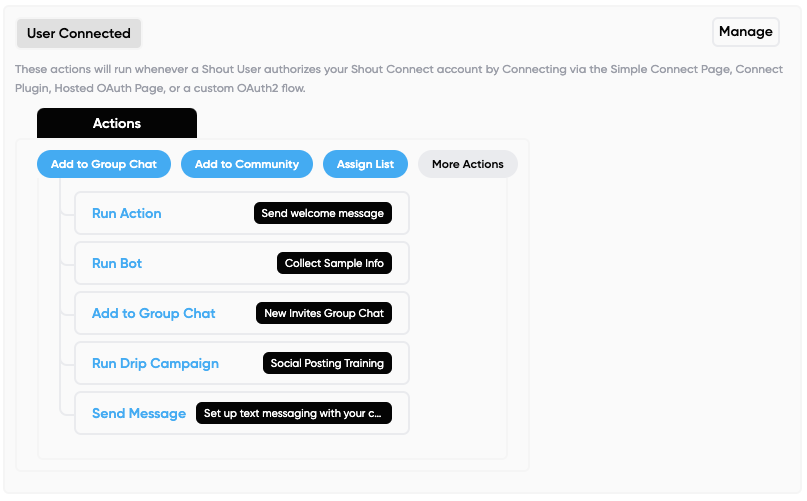
One of the most common use cases for Shout Connect is the need to provide a centralized and standardized onboarding experience for each member of an organization. Shout Connect excels at providing this onboarding experience using Shout Actions. You can run any Shout Action whenever someone Authorizes your Shout Connect account and whenever someone revokes permission to the Shout Connect Account. For onboarding, you'll run actions when someone Authorizes the Shout Connect Account. For example, let's assume that when someone joins your organization, you'd like to do the following:
Example Onboarding
Send a welcome message
Gather shipping info for sending product samples
Connect them with other new members of your organization for training and onbooarding
Start training to begin interacting on behalf of the organization on Social Media
Configure their Shout Account for sending Order Alerts and Order Follow Ups via text message to customers that order from them
While creating this onboarding content is beyond the scope of this guide, sharing the content and managing this process is as easy as adding Shout Actions for each step in the Shout Connect Account when someone Authorizes the connect account.
Login to your Shout account and navigate to your Shout Connect services Page by clicking on Settings > Services > Shout Connect. If the page is not visible contact Shout support to have it enabled on your account.
Scroll down to the section called Connected Account Authorizations
Add the Shout Actions associated with each of the onboarding steps outlined above
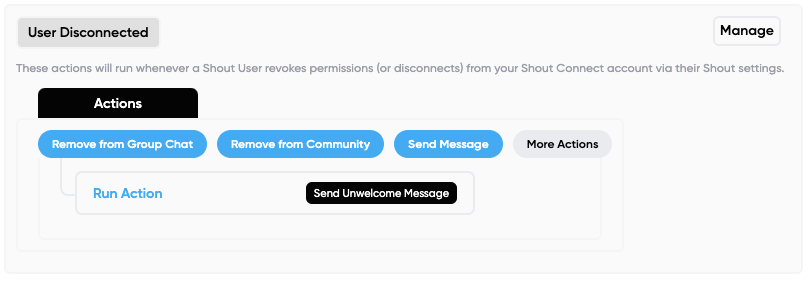
Offboarding & Account Management
Another common use case for Shout Connect is the need to members of the organizations that leave or offboard. With Shout Connect, beginning this process is as simple as instructing them to disconnect from your Shout Connect account. This allows you to automatically run Shout Actions when the account revokes permissions. Learn more about Shout Actions here. You can run any Shout Action whenever someone revokes permissions to your Shout Connect account. To set this up follow the simple stesp below:
Login to your Shout account and navigate to your Shout Connect services Page by clicking on Settings > Services > Shout Connect. If the page is not visible contact Shout support to have it enabled on your account.
Scroll down to the section called User Disconnected
Add the Shout Actions associated with each of the offboarding actions you'd like run for your organization
Add an Order to a Connected Account
Adding an order to a connected account facilitates some of Shout's most common use cases for Shout Connect, such as sending out Order Alerts via text via an affiliate or distributor's phone number and sending order follow ups to increase repeat customer purchases and facilitate support directly with affiliates and distributors.
Adding an order is done via the Shout API, and it's as simple as sending the order information via the Shout API with the correct Shout user id. Here's a quick example of how to add an order to a connected account.
Before You Get Started
If you've come straight here, here are a few things you'll need to do before you start sending orders to connected accounts:
Make sure you or your organization has Shout Connect enabled on their account. If you're not sure, login to your Shout account and navigate to Settings > Services > Shout Connect. If you aren't able to access the Shout Connect page, reach out to Shout support (for production environments) or Shout Developers (for development environments) and ask to have it enabled for your organization first.
Make sure that you have at least one other shout account that has authorized your Shout Connect account. You can read more about this in the Shout Connect Overview.
Step-By-Step Adding an Order to a Connected Account
Construct the payload for the Order Create api call.
Include the X-Shout-Connect-IDORX-Shout-User-Id special headers along with the API credentials header in your call. Check out the documentation here for more information.
Post to the Orders Create endpoint.
Once you're all set up, adding an order is more about deciding what information you'd like to make available and what experience you are enabling for a connected user. For example, if you are backfilling historical orders, you may want to ensure that it doesn't trigger any automatic order alerts in the connected account. If instead the intended use case is to send near real-time order alerts via text message, you'll want to make sure you're supplying the information the connected user is expecting for the order alert.
Provided below is an example for both of these scenarios. The difference between the payloads of each API call is just the dont_trigger_auto_actions field in the payload and the dates. Include that field when you are backfilling orders and do not want to trigger order alerts.
Furthermore, the profile fields, specifically profile_name, profile_email, and profile_phone_number are only used if you do not provide the profile_id field or if their is not already a contact profile in the connected account with the phone number or email provided. To be clear, if there is no contact profile with the provided phone or email, a new profile will be created with the provided profile fields. It is best practice to provide as many of the profile fields as you have available, since usually you will not know if a contact profile already exists with the phone number or email address.
Language
Variant
Example Input
{"order":{"invoiced_at":"now","paid_at":"now","description":"Order from Ecommerce Site","profile_name":"Janet Smith","profile_phone_number":"(801) 555-6788","profile_shipping_address_raw":"1 E Center St, Provo, UT 84606","line_items":[{"name":"Tank Top","each_price_cents":3500,"quantity":2,"price_cents":7000},{"name":"T-Shirt","each_price_cents":4900,"quantity":1,"price_cents":4900}],"total_cents":16800,"fail_if_connect_orders_not_enabled":true}}
curl https://www.shout.app/api/v20210901/orders -X POST \-u username:password \-d"{\"order\":{\"invoiced_at\":\"now\",\"paid_at\":\"now\",\"description\":\"Order from Ecommerce Site\",\"profile_name\":\"Janet Smith\",\"profile_phone_number\":\"(801) 555-6788\",\"profile_shipping_address_raw\":\"1 E Center St, Provo, UT 84606\",\"line_items\":[{\"name\":\"Tank Top\",\"each_price_cents\":3500,\"quantity\":2,\"price_cents\":7000},{\"name\":\"T-Shirt\",\"each_price_cents\":4900,\"quantity\":1,\"price_cents\":4900}],\"total_cents\":16800,\"fail_if_connect_orders_not_enabled\":true}}"
require'net/http'require'uri'require'json'uri=URI.parse("https://www.shout.app/api/v20210901/orders")uri.query={"order":{"invoiced_at":"now","paid_at":"now","description":"Order from Ecommerce Site","profile_name":"Janet Smith","profile_phone_number":"(801) 555-6788","profile_shipping_address_raw":"1 E Center St, Provo, UT 84606","line_items":[{"name":"Tank Top","each_price_cents":3500,"quantity":2,"price_cents":7000},{"name":"T-Shirt","each_price_cents":4900,"quantity":1,"price_cents":4900}],"total_cents":16800,"fail_if_connect_orders_not_enabled":true}}request=Net::HTTP::Post.new(uri)request.basic_auth("username","password")request.body=JSON.dump({"order":{"invoiced_at":"now","paid_at":"now","description":"Order from Ecommerce Site","profile_name":"Janet Smith","profile_phone_number":"(801) 555-6788","profile_shipping_address_raw":"1 E Center St, Provo, UT 84606","line_items":[{"name":"Tank Top","each_price_cents":3500,"quantity":2,"price_cents":7000},{"name":"T-Shirt","each_price_cents":4900,"quantity":1,"price_cents":4900}],"total_cents":16800,"fail_if_connect_orders_not_enabled":true}})req_options={use_ssl: uri.scheme=="https"}response=Net::HTTP.start(uri.hostname,uri.port,req_options)do|http|http.request(request)end# response.code# response.body
importrequestsfromrequests.structuresimportCaseInsensitiveDicturl="https://www.shout.app/api/v20210901/orders"headers={"Content-Type":"application/json",}data='{"order":{"invoiced_at":"now","paid_at":"now","description":"Order from Ecommerce Site","profile_name":"Janet Smith","profile_phone_number":"(801) 555-6788","profile_shipping_address_raw":"1 E Center St, Provo, UT 84606","line_items":[{"name":"Tank Top","each_price_cents":3500,"quantity":2,"price_cents":7000},{"name":"T-Shirt","each_price_cents":4900,"quantity":1,"price_cents":4900}],"total_cents":16800,"fail_if_connect_orders_not_enabled":true}}'response=requests.post(url,headers=headers,data=data,auth=('username','password'))print(response.status_code)
$ch=curl_init();curl_setopt($ch,CURLOPT_URL,'https://www.shout.app/api/v20210901/orders');curl_setopt($ch,CURLOPT_RETURNTRANSFER,1);curl_setopt($ch,CURLOPT_POST,1);curl_setopt($ch,CURLOPT_POSTFIELDS,"{\"order\":{\"invoiced_at\":\"now\",\"paid_at\":\"now\",\"description\":\"Order from Ecommerce Site\",\"profile_name\":\"Janet Smith\",\"profile_phone_number\":\"(801) 555-6788\",\"profile_shipping_address_raw\":\"1 E Center St, Provo, UT 84606\",\"line_items\":[{\"name\":\"Tank Top\",\"each_price_cents\":3500,\"quantity\":2,\"price_cents\":7000},{\"name\":\"T-Shirt\",\"each_price_cents\":4900,\"quantity\":1,\"price_cents\":4900}],\"total_cents\":16800,\"fail_if_connect_orders_not_enabled\":true}}");$headers=array();$headers[]='Content-Type: application/x-www-form-urlencoded';curl_setopt($ch,CURLOPT_USERPWD,'username'.':'.'password');curl_setopt($ch,CURLOPT_HTTPHEADER,$headers);$result=curl_exec($ch);if(curl_errno($ch)){echo'Error:'.curl_error($ch);}curl_close($ch);
importjavax.xml.bind.DatatypeConverter;importjava.io.IOException;importjava.io.InputStream;importjava.io.OutputStreamWriter;importjava.net.HttpURLConnection;importjava.net.URL;importjava.util.Scanner;classMain{publicstaticvoidmain(String[]args)throwsIOException{URLurl=newURL("https://www.shout.app/api/v20210901/orders");HttpURLConnectionhttpConn=(HttpURLConnection)url.openConnection();httpConn.setRequestMethod("POST");byte[]message=("username:password").getBytes("UTF-8");StringbasicAuth=DatatypeConverter.printBase64Binary(message);httpConn.setRequestProperty("Authorization","Basic "+basicAuth);httpConn.setDoOutput(true);OutputStreamWriterwriter=newOutputStreamWriter(httpConn.getOutputStream());writer.write("{\"order\":{\"invoiced_at\":\"now\",\"paid_at\":\"now\",\"description\":\"Order from Ecommerce Site\",\"profile_name\":\"Janet Smith\",\"profile_phone_number\":\"(801) 555-6788\",\"profile_shipping_address_raw\":\"1 E Center St, Provo, UT 84606\",\"line_items\":[{\"name\":\"Tank Top\",\"each_price_cents\":3500,\"quantity\":2,\"price_cents\":7000},{\"name\":\"T-Shirt\",\"each_price_cents\":4900,\"quantity\":1,\"price_cents\":4900}],\"total_cents\":16800,\"fail_if_connect_orders_not_enabled\":true}}");writer.flush();writer.close();httpConn.getOutputStream().close();InputStreamresponseStream=httpConn.getResponseCode()/100==2?httpConn.getInputStream():httpConn.getErrorStream();Scanners=newScanner(responseStream).useDelimiter("\A");Stringresponse=s.hasNext()?s.next():"";System.out.println(response);}}
varrequest=require('request');varheaders={};vardataString='{"order":{"invoiced_at":"now","paid_at":"now","description":"Order from Ecommerce Site","profile_name":"Janet Smith","profile_phone_number":"(801) 555-6788","profile_shipping_address_raw":"1 E Center St, Provo, UT 84606","line_items":[{"name":"Tank Top","each_price_cents":3500,"quantity":2,"price_cents":7000},{"name":"T-Shirt","each_price_cents":4900,"quantity":1,"price_cents":4900}],"total_cents":16800,"fail_if_connect_orders_not_enabled":true}}';varoptions={url:'https://www.shout.app/api/v20210901/orders',method:'POST',headers:headers,body:dataString,auth:{'user':'username','pass':'password'}};functioncallback(error,response,body){if (!error&&response.statusCode==200){console.log(body);}}request(options,callback);
packagemainimport("fmt""io/ioutil""log""net/http""strings")funcmain(){client:=&http.Client{}vardata=strings.NewReader(`{"order":{"invoiced_at":"now","paid_at":"now","description":"Order from Ecommerce Site","profile_name":"Janet Smith","profile_phone_number":"(801) 555-6788","profile_shipping_address_raw":"1 E Center St, Provo, UT 84606","line_items":[{"name":"Tank Top","each_price_cents":3500,"quantity":2,"price_cents":7000},{"name":"T-Shirt","each_price_cents":4900,"quantity":1,"price_cents":4900}],"total_cents":16800,"fail_if_connect_orders_not_enabled":true}}`)req,err:=http.NewRequest("POST","https://www.shout.app/api/v20210901/orders",data)iferr!=nil{log.Fatal(err)}req.SetBasicAuth("username","password")resp,err:=client.Do(req)iferr!=nil{log.Fatal(err)}deferresp.Body.Close()bodyText,err:=ioutil.ReadAll(resp.Body)iferr!=nil{log.Fatal(err)}fmt.Printf("%s\n",bodyText)}
using (var httpClient = new HttpClient())
{
    using (var request = new HttpRequestMessage(new HttpMethod("POST"), "https://www.shout.app/api/v20210901/orders"))
    {
        var base64authorization = Convert.ToBase64String(Encoding.ASCII.GetBytes("username:password"));
        request.Headers.TryAddWithoutValidation("Authorization", $"Basic {base64authorization}");


        request.Content = new StringContent({"order":{"invoiced_at":"now","paid_at":"now","description":"Order from Ecommerce Site","profile_name":"Janet Smith","profile_phone_number":"(801) 555-6788","profile_shipping_address_raw":"1 E Center St, Provo, UT 84606","line_items":[{"name":"Tank Top","each_price_cents":3500,"quantity":2,"price_cents":7000},{"name":"T-Shirt","each_price_cents":4900,"quantity":1,"price_cents":4900}],"total_cents":16800,"fail_if_connect_orders_not_enabled":true}});
        request.Content.Headers.ContentType = MediaTypeHeaderValue.Parse("application/x-www-form-urlencoded");

        var response = await httpClient.SendAsync(request);
    }
}
Example Response
{"id":234868,"company_id":8109,"created_at":"2023-06-21T22:06:02.799121-06:00","description":"Order from Ecommerce Site","dont_trigger_auto_actions":false,"integration":"connect","invoiced_at":"2023-06-21T22:06:02.775344-06:00","invoiced_source":"connect","line_items":[{"each_price":"$35.00","each_price_cents":3500,"each_price_currency":"USD","name":"Tank Top","object":"order_line_item","price":"$70.00","price_cents":7000,"price_currency":"USD","quantity":2.0},{"each_price":"$49.00","each_price_cents":4900,"each_price_currency":"USD","name":"T-Shirt","object":"order_line_item","price":"$49.00","price_cents":4900,"price_currency":"USD","quantity":1.0}],"metadata":null,"notified_profile_of_paid_invoice_at":null,"object":"order","paid_at":"2023-06-21T22:06:02.775368-06:00","paid_source":"connect","profile_email":null,"profile_id":6645902,"profile_name":"Janet Smith","profile_phone_number":"+18015556788","profile_shipping_address_raw":"1 E Center St, Provo, UT 84606","reference_id":null,"refunded_at":null,"refunded_source":null,"shipped_at":null,"shipped_source":null,"status":"paid","total":"$168.00","total_cents":16800,"total_currency":"USD","updated_at":"2023-06-21T22:06:02.799121-06:00"}
Example Input
{"order":{"created_at":"2021-04-09T12:00:00.123456-06:00","invoiced_at":"2023-01-03","paid_at":"2023-01-03","description":"Order from Ecommerce Site","profile_name":"Janet Smith","profile_phone_number":"(801) 555-6788","profile_shipping_address_raw":"1 E Center St, Provo, UT 84606","line_items":[{"name":"Tank Top","each_price_cents":3500,"quantity":2,"price_cents":7000},{"name":"T-Shirt","each_price_cents":4900,"quantity":1,"price_cents":4900}],"total_cents":16800,"fail_if_connect_orders_not_enabled":true,"dont_trigger_auto_actions":true}}
curl https://www.shout.app/api/v20210901/orders -X POST \-u username:password \-d"{\"order\":{\"created_at\":\"2021-04-09T12:00:00.123456-06:00\",\"invoiced_at\":\"2023-01-03\",\"paid_at\":\"2023-01-03\",\"description\":\"Order from Ecommerce Site\",\"profile_name\":\"Janet Smith\",\"profile_phone_number\":\"(801) 555-6788\",\"profile_shipping_address_raw\":\"1 E Center St, Provo, UT 84606\",\"line_items\":[{\"name\":\"Tank Top\",\"each_price_cents\":3500,\"quantity\":2,\"price_cents\":7000},{\"name\":\"T-Shirt\",\"each_price_cents\":4900,\"quantity\":1,\"price_cents\":4900}],\"total_cents\":16800,\"fail_if_connect_orders_not_enabled\":true,\"dont_trigger_auto_actions\":true}}"
require'net/http'require'uri'require'json'uri=URI.parse("https://www.shout.app/api/v20210901/orders")uri.query={"order":{"created_at":"2021-04-09T12:00:00.123456-06:00","invoiced_at":"2023-01-03","paid_at":"2023-01-03","description":"Order from Ecommerce Site","profile_name":"Janet Smith","profile_phone_number":"(801) 555-6788","profile_shipping_address_raw":"1 E Center St, Provo, UT 84606","line_items":[{"name":"Tank Top","each_price_cents":3500,"quantity":2,"price_cents":7000},{"name":"T-Shirt","each_price_cents":4900,"quantity":1,"price_cents":4900}],"total_cents":16800,"fail_if_connect_orders_not_enabled":true,"dont_trigger_auto_actions":true}}request=Net::HTTP::Post.new(uri)request.basic_auth("username","password")request.body=JSON.dump({"order":{"created_at":"2021-04-09T12:00:00.123456-06:00","invoiced_at":"2023-01-03","paid_at":"2023-01-03","description":"Order from Ecommerce Site","profile_name":"Janet Smith","profile_phone_number":"(801) 555-6788","profile_shipping_address_raw":"1 E Center St, Provo, UT 84606","line_items":[{"name":"Tank Top","each_price_cents":3500,"quantity":2,"price_cents":7000},{"name":"T-Shirt","each_price_cents":4900,"quantity":1,"price_cents":4900}],"total_cents":16800,"fail_if_connect_orders_not_enabled":true,"dont_trigger_auto_actions":true}})req_options={use_ssl: uri.scheme=="https"}response=Net::HTTP.start(uri.hostname,uri.port,req_options)do|http|http.request(request)end# response.code# response.body
importrequestsfromrequests.structuresimportCaseInsensitiveDicturl="https://www.shout.app/api/v20210901/orders"headers={"Content-Type":"application/json",}data='{"order":{"created_at":"2021-04-09T12:00:00.123456-06:00","invoiced_at":"2023-01-03","paid_at":"2023-01-03","description":"Order from Ecommerce Site","profile_name":"Janet Smith","profile_phone_number":"(801) 555-6788","profile_shipping_address_raw":"1 E Center St, Provo, UT 84606","line_items":[{"name":"Tank Top","each_price_cents":3500,"quantity":2,"price_cents":7000},{"name":"T-Shirt","each_price_cents":4900,"quantity":1,"price_cents":4900}],"total_cents":16800,"fail_if_connect_orders_not_enabled":true,"dont_trigger_auto_actions":true}}'response=requests.post(url,headers=headers,data=data,auth=('username','password'))print(response.status_code)
$ch=curl_init();curl_setopt($ch,CURLOPT_URL,'https://www.shout.app/api/v20210901/orders');curl_setopt($ch,CURLOPT_RETURNTRANSFER,1);curl_setopt($ch,CURLOPT_POST,1);curl_setopt($ch,CURLOPT_POSTFIELDS,"{\"order\":{\"created_at\":\"2021-04-09T12:00:00.123456-06:00\",\"invoiced_at\":\"2023-01-03\",\"paid_at\":\"2023-01-03\",\"description\":\"Order from Ecommerce Site\",\"profile_name\":\"Janet Smith\",\"profile_phone_number\":\"(801) 555-6788\",\"profile_shipping_address_raw\":\"1 E Center St, Provo, UT 84606\",\"line_items\":[{\"name\":\"Tank Top\",\"each_price_cents\":3500,\"quantity\":2,\"price_cents\":7000},{\"name\":\"T-Shirt\",\"each_price_cents\":4900,\"quantity\":1,\"price_cents\":4900}],\"total_cents\":16800,\"fail_if_connect_orders_not_enabled\":true,\"dont_trigger_auto_actions\":true}}");$headers=array();$headers[]='Content-Type: application/x-www-form-urlencoded';curl_setopt($ch,CURLOPT_USERPWD,'username'.':'.'password');curl_setopt($ch,CURLOPT_HTTPHEADER,$headers);$result=curl_exec($ch);if(curl_errno($ch)){echo'Error:'.curl_error($ch);}curl_close($ch);
importjavax.xml.bind.DatatypeConverter;importjava.io.IOException;importjava.io.InputStream;importjava.io.OutputStreamWriter;importjava.net.HttpURLConnection;importjava.net.URL;importjava.util.Scanner;classMain{publicstaticvoidmain(String[]args)throwsIOException{URLurl=newURL("https://www.shout.app/api/v20210901/orders");HttpURLConnectionhttpConn=(HttpURLConnection)url.openConnection();httpConn.setRequestMethod("POST");byte[]message=("username:password").getBytes("UTF-8");StringbasicAuth=DatatypeConverter.printBase64Binary(message);httpConn.setRequestProperty("Authorization","Basic "+basicAuth);httpConn.setDoOutput(true);OutputStreamWriterwriter=newOutputStreamWriter(httpConn.getOutputStream());writer.write("{\"order\":{\"created_at\":\"2021-04-09T12:00:00.123456-06:00\",\"invoiced_at\":\"2023-01-03\",\"paid_at\":\"2023-01-03\",\"description\":\"Order from Ecommerce Site\",\"profile_name\":\"Janet Smith\",\"profile_phone_number\":\"(801) 555-6788\",\"profile_shipping_address_raw\":\"1 E Center St, Provo, UT 84606\",\"line_items\":[{\"name\":\"Tank Top\",\"each_price_cents\":3500,\"quantity\":2,\"price_cents\":7000},{\"name\":\"T-Shirt\",\"each_price_cents\":4900,\"quantity\":1,\"price_cents\":4900}],\"total_cents\":16800,\"fail_if_connect_orders_not_enabled\":true,\"dont_trigger_auto_actions\":true}}");writer.flush();writer.close();httpConn.getOutputStream().close();InputStreamresponseStream=httpConn.getResponseCode()/100==2?httpConn.getInputStream():httpConn.getErrorStream();Scanners=newScanner(responseStream).useDelimiter("\A");Stringresponse=s.hasNext()?s.next():"";System.out.println(response);}}
varrequest=require('request');varheaders={};vardataString='{"order":{"created_at":"2021-04-09T12:00:00.123456-06:00","invoiced_at":"2023-01-03","paid_at":"2023-01-03","description":"Order from Ecommerce Site","profile_name":"Janet Smith","profile_phone_number":"(801) 555-6788","profile_shipping_address_raw":"1 E Center St, Provo, UT 84606","line_items":[{"name":"Tank Top","each_price_cents":3500,"quantity":2,"price_cents":7000},{"name":"T-Shirt","each_price_cents":4900,"quantity":1,"price_cents":4900}],"total_cents":16800,"fail_if_connect_orders_not_enabled":true,"dont_trigger_auto_actions":true}}';varoptions={url:'https://www.shout.app/api/v20210901/orders',method:'POST',headers:headers,body:dataString,auth:{'user':'username','pass':'password'}};functioncallback(error,response,body){if (!error&&response.statusCode==200){console.log(body);}}request(options,callback);
packagemainimport("fmt""io/ioutil""log""net/http""strings")funcmain(){client:=&http.Client{}vardata=strings.NewReader(`{"order":{"created_at":"2021-04-09T12:00:00.123456-06:00","invoiced_at":"2023-01-03","paid_at":"2023-01-03","description":"Order from Ecommerce Site","profile_name":"Janet Smith","profile_phone_number":"(801) 555-6788","profile_shipping_address_raw":"1 E Center St, Provo, UT 84606","line_items":[{"name":"Tank Top","each_price_cents":3500,"quantity":2,"price_cents":7000},{"name":"T-Shirt","each_price_cents":4900,"quantity":1,"price_cents":4900}],"total_cents":16800,"fail_if_connect_orders_not_enabled":true,"dont_trigger_auto_actions":true}}`)req,err:=http.NewRequest("POST","https://www.shout.app/api/v20210901/orders",data)iferr!=nil{log.Fatal(err)}req.SetBasicAuth("username","password")resp,err:=client.Do(req)iferr!=nil{log.Fatal(err)}deferresp.Body.Close()bodyText,err:=ioutil.ReadAll(resp.Body)iferr!=nil{log.Fatal(err)}fmt.Printf("%s\n",bodyText)}
using (var httpClient = new HttpClient())
{
    using (var request = new HttpRequestMessage(new HttpMethod("POST"), "https://www.shout.app/api/v20210901/orders"))
    {
        var base64authorization = Convert.ToBase64String(Encoding.ASCII.GetBytes("username:password"));
        request.Headers.TryAddWithoutValidation("Authorization", $"Basic {base64authorization}");


        request.Content = new StringContent({"order":{"created_at":"2021-04-09T12:00:00.123456-06:00","invoiced_at":"2023-01-03","paid_at":"2023-01-03","description":"Order from Ecommerce Site","profile_name":"Janet Smith","profile_phone_number":"(801) 555-6788","profile_shipping_address_raw":"1 E Center St, Provo, UT 84606","line_items":[{"name":"Tank Top","each_price_cents":3500,"quantity":2,"price_cents":7000},{"name":"T-Shirt","each_price_cents":4900,"quantity":1,"price_cents":4900}],"total_cents":16800,"fail_if_connect_orders_not_enabled":true,"dont_trigger_auto_actions":true}});
        request.Content.Headers.ContentType = MediaTypeHeaderValue.Parse("application/x-www-form-urlencoded");

        var response = await httpClient.SendAsync(request);
    }
}
Example Response
{"id":234866,"company_id":8109,"created_at":"2023-06-21T21:59:48.772962-06:00","description":"Order from Ecommerce Site","dont_trigger_auto_actions":false,"integration":"connect","invoiced_at":null,"invoiced_source":null,"line_items":[{"each_price":"$35.00","each_price_cents":3500,"each_price_currency":"USD","name":"Tank Top","object":"order_line_item","price":"$70.00","price_cents":7000,"price_currency":"USD","quantity":2.0},{"each_price":"$49.00","each_price_cents":4900,"each_price_currency":"USD","name":"T-Shirt","object":"order_line_item","price":"$49.00","price_cents":4900,"price_currency":"USD","quantity":1.0}],"metadata":null,"notified_profile_of_paid_invoice_at":null,"object":"order","paid_at":null,"paid_source":null,"profile_email":null,"profile_id":6645902,"profile_name":"Janet Smith","profile_phone_number":"+18015556788","profile_shipping_address_raw":"1 E Center St, Provo, UT 84606","reference_id":null,"refunded_at":null,"refunded_source":null,"shipped_at":null,"shipped_source":null,"status":"draft","total":"$168.00","total_cents":16800,"total_currency":"USD","updated_at":"2023-06-21T21:59:48.772962-06:00"}
Send an Announcement to Connected Accounts
Sending announcements is another common use case for Shout Connect. Each Shout Connect account includes a Group Chat dedicated for announcements that can be configured inside of the Shout interface with custom profile photos, cover photos, descriptions, and many more settings. When the Announcements feature is enabled on the Connect Account, each account that connects is automatically added as a member to the Announcements group chat. This Shout User cannot leave the Announcements group chat unless they first disconnect from the Connect Account from their settings. Whenever a message is posted to the Announcements group chat (whether via API call or directly from the Shout interface), each person in the group chat is notified via push notification (mobile devices and desktop applications) or browser notification (web application) according to their own personalized notification settings (meaning that a Shout user can choose whether they want to be notified for all messages, messages in which they are mentioned, or no messages). By default all members of the Announcements group chat recieve all notifications. Announcements can be sent via API or directly from the Shout interface.
Before You Get Started
If you've come straight here, here are a few things you'll need to do before you start sending announcements to connected accounts:
Make sure you or your organization has Shout Connect enabled on their account. If you're not sure, login to your Shout account and navigate to Settings > Services > Shout Connect. If you aren't able to access the Shout Connect page, reach out to Shout support (for production environments) or Shout Developers (for development environments) and ask to have it enabled for your organization first.
Make sure that you have at least one other shout account that has authorized your Shout Connect account. You can read more about this in the Shout Connect Overview.
Make sure that the Announcements feature is enabled for the Connect Account from the Shout Connect page.
Step-By-Step Sending an Announcement to Connected Accounts
Include the API credentials header in your call. Check out the documentation here for more information.
Post to the Send Annoucement endpoint.
Sending an annoucement should be very straight forward. Shout will receive your call, respond, and then create the message, post it to the Announcements group chat for the Connect Account, and then generate push notifications and browser notifications for all of the members of the group chat (each connected account) according to their notification preferences. Included below is an example call and response.
Language
Example Input
{"message":{"body":"An announcement message to everyone whose connected to my Shout Connect"}}
curl https://www.shout.app/api/v20230615/messages/send_connect_announcement -X POST \-u username:password \-d"{\"message\":{\"body\":\"An announcement message to everyone whose connected to my Shout Connect\"}}"
require'net/http'require'uri'require'json'uri=URI.parse("https://www.shout.app/api/v20230615/messages/send_connect_announcement")uri.query={"message":{"body":"An announcement message to everyone whose connected to my Shout Connect"}}request=Net::HTTP::Post.new(uri)request.basic_auth("username","password")request.body=JSON.dump({"message":{"body":"An announcement message to everyone whose connected to my Shout Connect"}})req_options={use_ssl: uri.scheme=="https"}response=Net::HTTP.start(uri.hostname,uri.port,req_options)do|http|http.request(request)end# response.code# response.body
importrequestsfromrequests.structuresimportCaseInsensitiveDicturl="https://www.shout.app/api/v20230615/messages/send_connect_announcement"headers={"Content-Type":"application/json",}data='{"message":{"body":"An announcement message to everyone whose connected to my Shout Connect"}}'response=requests.post(url,headers=headers,data=data,auth=('username','password'))print(response.status_code)
$ch=curl_init();curl_setopt($ch,CURLOPT_URL,'https://www.shout.app/api/v20230615/messages/send_connect_announcement');curl_setopt($ch,CURLOPT_RETURNTRANSFER,1);curl_setopt($ch,CURLOPT_POST,1);curl_setopt($ch,CURLOPT_POSTFIELDS,"{\"message\":{\"body\":\"An announcement message to everyone whose connected to my Shout Connect\"}}");$headers=array();$headers[]='Content-Type: application/x-www-form-urlencoded';curl_setopt($ch,CURLOPT_USERPWD,'username'.':'.'password');curl_setopt($ch,CURLOPT_HTTPHEADER,$headers);$result=curl_exec($ch);if(curl_errno($ch)){echo'Error:'.curl_error($ch);}curl_close($ch);
importjavax.xml.bind.DatatypeConverter;importjava.io.IOException;importjava.io.InputStream;importjava.io.OutputStreamWriter;importjava.net.HttpURLConnection;importjava.net.URL;importjava.util.Scanner;classMain{publicstaticvoidmain(String[]args)throwsIOException{URLurl=newURL("https://www.shout.app/api/v20230615/messages/send_connect_announcement");HttpURLConnectionhttpConn=(HttpURLConnection)url.openConnection();httpConn.setRequestMethod("POST");byte[]message=("username:password").getBytes("UTF-8");StringbasicAuth=DatatypeConverter.printBase64Binary(message);httpConn.setRequestProperty("Authorization","Basic "+basicAuth);httpConn.setDoOutput(true);OutputStreamWriterwriter=newOutputStreamWriter(httpConn.getOutputStream());writer.write("{\"message\":{\"body\":\"An announcement message to everyone whose connected to my Shout Connect\"}}");writer.flush();writer.close();httpConn.getOutputStream().close();InputStreamresponseStream=httpConn.getResponseCode()/100==2?httpConn.getInputStream():httpConn.getErrorStream();Scanners=newScanner(responseStream).useDelimiter("\A");Stringresponse=s.hasNext()?s.next():"";System.out.println(response);}}
varrequest=require('request');varheaders={};vardataString='{"message":{"body":"An announcement message to everyone whose connected to my Shout Connect"}}';varoptions={url:'https://www.shout.app/api/v20230615/messages/send_connect_announcement',method:'POST',headers:headers,body:dataString,auth:{'user':'username','pass':'password'}};functioncallback(error,response,body){if (!error&&response.statusCode==200){console.log(body);}}request(options,callback);
packagemainimport("fmt""io/ioutil""log""net/http""strings")funcmain(){client:=&http.Client{}vardata=strings.NewReader(`{"message":{"body":"An announcement message to everyone whose connected to my Shout Connect"}}`)req,err:=http.NewRequest("POST","https://www.shout.app/api/v20230615/messages/send_connect_announcement",data)iferr!=nil{log.Fatal(err)}req.SetBasicAuth("username","password")resp,err:=client.Do(req)iferr!=nil{log.Fatal(err)}deferresp.Body.Close()bodyText,err:=ioutil.ReadAll(resp.Body)iferr!=nil{log.Fatal(err)}fmt.Printf("%s\n",bodyText)}
using (var httpClient = new HttpClient())
{
    using (var request = new HttpRequestMessage(new HttpMethod("POST"), "https://www.shout.app/api/v20230615/messages/send_connect_announcement"))
    {
        var base64authorization = Convert.ToBase64String(Encoding.ASCII.GetBytes("username:password"));
        request.Headers.TryAddWithoutValidation("Authorization", $"Basic {base64authorization}");


        request.Content = new StringContent({"message":{"body":"An announcement message to everyone whose connected to my Shout Connect"}});
        request.Content.Headers.ContentType = MediaTypeHeaderValue.Parse("application/x-www-form-urlencoded");

        var response = await httpClient.SendAsync(request);
    }
}
Sending a direct message is another common use case for Shout Connect. Each Shout Connect account includes a direct message conversation with a connected account. Direct messages are recommended when you want to facilitate two way communications and the expectation is that the connect account can respond and someone will answer, such as support requests. Whenever a message is posted to the connected account (whether via API call or directly from the Shout interface), the recipient is notified via push notification (mobile devices and desktop applications) or browser notification (web application) according to their own personalized notification settings (meaning that a Shout user can choose mute the conversation). By default all connected accounts recieve all notifications. Messages can be sent via API or directly from the Shout interface.
Use this API endpoint if you are sending a single message to a single connected account. If you are sending the same message to multiple connected accounts use the /messages/broadcast_message endpoint.
Before You Get Started
If you've come straight here, here are a few things you'll need to do before you start sending messages to connected accounts:
Make sure you or your organization has Shout Connect enabled on their account. If you're not sure, login to your Shout account and navigate to Settings > Services > Shout Connect. If you aren't able to access the Shout Connect page, reach out to Shout support (for production environments) or Shout Developers (for development environments) and ask to have it enabled for your organization first.
Make sure that you have at least one other shout account that has authorized your Shout Connect account. You can read more about this in the Shout Connect Overview.
Step-By-Step Sending a Message to Connected Accounts
Construct the payload for the Send Shout Message api call if you are sending to a single recipient OR the Send Broadcast Message if you are sending to multiple recipients api call.
Include the API credentials header in your call. Check out the documentation here for more information.
Post to the Send Shout Message or Send Broadcast Message endpoint.
Sending a message should be very straight forward. You can indicate either a connect_id or a shout user_id as a recipient. Shout will receive your call, respond, and then create the message, post it to the correct conversation for the Connect Account, and then generate push notifications and browser notifications for the recipient(s) (each connected account) according to their notification preferences. Included below is an example call and response.
Language
Variant
Example Input
{"message":{"body":"A message to a connect id","connect_id":"1933"}}
curl https://www.shout.app/api/v20230615/messages/send_shout_message -X POST \-u username:password \-d"{\"message\":{\"body\":\"A message to a connect id\",\"connect_id\":\"1933\"}}"
require'net/http'require'uri'require'json'uri=URI.parse("https://www.shout.app/api/v20230615/messages/send_shout_message")uri.query={"message":{"body":"A message to a connect id","connect_id":"1933"}}request=Net::HTTP::Post.new(uri)request.basic_auth("username","password")request.body=JSON.dump({"message":{"body":"A message to a connect id","connect_id":"1933"}})req_options={use_ssl: uri.scheme=="https"}response=Net::HTTP.start(uri.hostname,uri.port,req_options)do|http|http.request(request)end# response.code# response.body
importrequestsfromrequests.structuresimportCaseInsensitiveDicturl="https://www.shout.app/api/v20230615/messages/send_shout_message"headers={"Content-Type":"application/json",}data='{"message":{"body":"A message to a connect id","connect_id":"1933"}}'response=requests.post(url,headers=headers,data=data,auth=('username','password'))print(response.status_code)
$ch=curl_init();curl_setopt($ch,CURLOPT_URL,'https://www.shout.app/api/v20230615/messages/send_shout_message');curl_setopt($ch,CURLOPT_RETURNTRANSFER,1);curl_setopt($ch,CURLOPT_POST,1);curl_setopt($ch,CURLOPT_POSTFIELDS,"{\"message\":{\"body\":\"A message to a connect id\",\"connect_id\":\"1933\"}}");$headers=array();$headers[]='Content-Type: application/x-www-form-urlencoded';curl_setopt($ch,CURLOPT_USERPWD,'username'.':'.'password');curl_setopt($ch,CURLOPT_HTTPHEADER,$headers);$result=curl_exec($ch);if(curl_errno($ch)){echo'Error:'.curl_error($ch);}curl_close($ch);
importjavax.xml.bind.DatatypeConverter;importjava.io.IOException;importjava.io.InputStream;importjava.io.OutputStreamWriter;importjava.net.HttpURLConnection;importjava.net.URL;importjava.util.Scanner;classMain{publicstaticvoidmain(String[]args)throwsIOException{URLurl=newURL("https://www.shout.app/api/v20230615/messages/send_shout_message");HttpURLConnectionhttpConn=(HttpURLConnection)url.openConnection();httpConn.setRequestMethod("POST");byte[]message=("username:password").getBytes("UTF-8");StringbasicAuth=DatatypeConverter.printBase64Binary(message);httpConn.setRequestProperty("Authorization","Basic "+basicAuth);httpConn.setDoOutput(true);OutputStreamWriterwriter=newOutputStreamWriter(httpConn.getOutputStream());writer.write("{\"message\":{\"body\":\"A message to a connect id\",\"connect_id\":\"1933\"}}");writer.flush();writer.close();httpConn.getOutputStream().close();InputStreamresponseStream=httpConn.getResponseCode()/100==2?httpConn.getInputStream():httpConn.getErrorStream();Scanners=newScanner(responseStream).useDelimiter("\A");Stringresponse=s.hasNext()?s.next():"";System.out.println(response);}}
varrequest=require('request');varheaders={};vardataString='{"message":{"body":"A message to a connect id","connect_id":"1933"}}';varoptions={url:'https://www.shout.app/api/v20230615/messages/send_shout_message',method:'POST',headers:headers,body:dataString,auth:{'user':'username','pass':'password'}};functioncallback(error,response,body){if (!error&&response.statusCode==200){console.log(body);}}request(options,callback);
packagemainimport("fmt""io/ioutil""log""net/http""strings")funcmain(){client:=&http.Client{}vardata=strings.NewReader(`{"message":{"body":"A message to a connect id","connect_id":"1933"}}`)req,err:=http.NewRequest("POST","https://www.shout.app/api/v20230615/messages/send_shout_message",data)iferr!=nil{log.Fatal(err)}req.SetBasicAuth("username","password")resp,err:=client.Do(req)iferr!=nil{log.Fatal(err)}deferresp.Body.Close()bodyText,err:=ioutil.ReadAll(resp.Body)iferr!=nil{log.Fatal(err)}fmt.Printf("%s\n",bodyText)}
using (var httpClient = new HttpClient())
{
    using (var request = new HttpRequestMessage(new HttpMethod("POST"), "https://www.shout.app/api/v20230615/messages/send_shout_message"))
    {
        var base64authorization = Convert.ToBase64String(Encoding.ASCII.GetBytes("username:password"));
        request.Headers.TryAddWithoutValidation("Authorization", $"Basic {base64authorization}");


        request.Content = new StringContent({"message":{"body":"A message to a connect id","connect_id":"1933"}});
        request.Content.Headers.ContentType = MediaTypeHeaderValue.Parse("application/x-www-form-urlencoded");

        var response = await httpClient.SendAsync(request);
    }
}
Example Response
{"id":13291,"body":"A message to a connect id","company_id":6,"conversation_id":3901,"created_at":"2023-06-21T19:31:34.675014-06:00","deleted_at":null,"dont_mark_as_open":null,"favorite":false,"favorited_at":null,"object":"message","profile_id":8831,"send_at":null,"updated_at":"2023-06-21T19:31:34.675014-06:00"}
Example Input
{"message":{"body":"A message to a user id","user_id":"519"}}
curl https://www.shout.app/api/v20230615/messages/send_shout_message -X POST \-u username:password \-d"{\"message\":{\"body\":\"A message to a user id\",\"user_id\":\"519\"}}"
require'net/http'require'uri'require'json'uri=URI.parse("https://www.shout.app/api/v20230615/messages/send_shout_message")uri.query={"message":{"body":"A message to a user id","user_id":"519"}}request=Net::HTTP::Post.new(uri)request.basic_auth("username","password")request.body=JSON.dump({"message":{"body":"A message to a user id","user_id":"519"}})req_options={use_ssl: uri.scheme=="https"}response=Net::HTTP.start(uri.hostname,uri.port,req_options)do|http|http.request(request)end# response.code# response.body
importrequestsfromrequests.structuresimportCaseInsensitiveDicturl="https://www.shout.app/api/v20230615/messages/send_shout_message"headers={"Content-Type":"application/json",}data='{"message":{"body":"A message to a user id","user_id":"519"}}'response=requests.post(url,headers=headers,data=data,auth=('username','password'))print(response.status_code)
$ch=curl_init();curl_setopt($ch,CURLOPT_URL,'https://www.shout.app/api/v20230615/messages/send_shout_message');curl_setopt($ch,CURLOPT_RETURNTRANSFER,1);curl_setopt($ch,CURLOPT_POST,1);curl_setopt($ch,CURLOPT_POSTFIELDS,"{\"message\":{\"body\":\"A message to a user id\",\"user_id\":\"519\"}}");$headers=array();$headers[]='Content-Type: application/x-www-form-urlencoded';curl_setopt($ch,CURLOPT_USERPWD,'username'.':'.'password');curl_setopt($ch,CURLOPT_HTTPHEADER,$headers);$result=curl_exec($ch);if(curl_errno($ch)){echo'Error:'.curl_error($ch);}curl_close($ch);
importjavax.xml.bind.DatatypeConverter;importjava.io.IOException;importjava.io.InputStream;importjava.io.OutputStreamWriter;importjava.net.HttpURLConnection;importjava.net.URL;importjava.util.Scanner;classMain{publicstaticvoidmain(String[]args)throwsIOException{URLurl=newURL("https://www.shout.app/api/v20230615/messages/send_shout_message");HttpURLConnectionhttpConn=(HttpURLConnection)url.openConnection();httpConn.setRequestMethod("POST");byte[]message=("username:password").getBytes("UTF-8");StringbasicAuth=DatatypeConverter.printBase64Binary(message);httpConn.setRequestProperty("Authorization","Basic "+basicAuth);httpConn.setDoOutput(true);OutputStreamWriterwriter=newOutputStreamWriter(httpConn.getOutputStream());writer.write("{\"message\":{\"body\":\"A message to a user id\",\"user_id\":\"519\"}}");writer.flush();writer.close();httpConn.getOutputStream().close();InputStreamresponseStream=httpConn.getResponseCode()/100==2?httpConn.getInputStream():httpConn.getErrorStream();Scanners=newScanner(responseStream).useDelimiter("\A");Stringresponse=s.hasNext()?s.next():"";System.out.println(response);}}
varrequest=require('request');varheaders={};vardataString='{"message":{"body":"A message to a user id","user_id":"519"}}';varoptions={url:'https://www.shout.app/api/v20230615/messages/send_shout_message',method:'POST',headers:headers,body:dataString,auth:{'user':'username','pass':'password'}};functioncallback(error,response,body){if (!error&&response.statusCode==200){console.log(body);}}request(options,callback);
packagemainimport("fmt""io/ioutil""log""net/http""strings")funcmain(){client:=&http.Client{}vardata=strings.NewReader(`{"message":{"body":"A message to a user id","user_id":"519"}}`)req,err:=http.NewRequest("POST","https://www.shout.app/api/v20230615/messages/send_shout_message",data)iferr!=nil{log.Fatal(err)}req.SetBasicAuth("username","password")resp,err:=client.Do(req)iferr!=nil{log.Fatal(err)}deferresp.Body.Close()bodyText,err:=ioutil.ReadAll(resp.Body)iferr!=nil{log.Fatal(err)}fmt.Printf("%s\n",bodyText)}
using (var httpClient = new HttpClient())
{
    using (var request = new HttpRequestMessage(new HttpMethod("POST"), "https://www.shout.app/api/v20230615/messages/send_shout_message"))
    {
        var base64authorization = Convert.ToBase64String(Encoding.ASCII.GetBytes("username:password"));
        request.Headers.TryAddWithoutValidation("Authorization", $"Basic {base64authorization}");


        request.Content = new StringContent({"message":{"body":"A message to a user id","user_id":"519"}});
        request.Content.Headers.ContentType = MediaTypeHeaderValue.Parse("application/x-www-form-urlencoded");

        var response = await httpClient.SendAsync(request);
    }
}
Example Response
{"id":13299,"body":"A message to a user id","company_id":6,"conversation_id":3902,"created_at":"2023-06-21T19:56:18.641260-06:00","deleted_at":null,"dont_mark_as_open":null,"favorite":false,"favorited_at":null,"object":"message","profile_id":8847,"send_at":null,"updated_at":"2023-06-21T19:56:18.641260-06:00"}
Send a Notification to a Connected Account
Sending a notification message is another common use case for Shout Connect. Each Shout Connect account includes a notification conversation with a connected account. Notifications are recommended when you want send messages and information to a connected account WITHOUT the expectation that the connect account can respond, such as alerting someone that someone has joined their team, an order has been placed, or a commission or payment has been initiated. Whenever a message is posted to the connected account (whether via API call or directly from the Shout interface), the recipient is notified via push notification (mobile devices and desktop applications) or browser notification (web application) according to their own personalized notification settings (meaning that a Shout user can choose mute the conversation). By default all connected accounts recieve all notifications. Messages can be sent via API or directly from the Shout interface.
Use this API endpoint if you are sending a single notification to a single connected account. If you are sending the same message to multiple connected accounts use the /messages/broadcast_message endpoint.
Before You Get Started
If you've come straight here, here are a few things you'll need to do before you start sending notifications to connected accounts:
Make sure you or your organization has Shout Connect enabled on their account. If you're not sure, login to your Shout account and navigate to Settings > Services > Shout Connect. If you aren't able to access the Shout Connect page, reach out to Shout support (for production environments) or Shout Developers (for development environments) and ask to have it enabled for your organization first.
Make sure that you have at least one other shout account that has authorized your Shout Connect account. You can read more about this in the Shout Connect Overview.
Step-By-Step Sending a Message to Connected Accounts
Construct the payload for the Send Shout Notification api call if you are sending to a single recipient OR the Send Broadcast Message if you are sending to multiple recipients api call.
Include the API credentials header in your call. Check out the documentation here for more information.
Post to the Send Connect Notification or Send Broadcast Message endpoint.
Sending a notification should be very straight forward. You can indicate either a connect_id or a shout user_id as a recipient. Shout will receive your call, respond, and then create the message, post it to the correct conversation for the Connect Account, and then generate push notifications and browser notifications for the recipient(s) (each connected account) according to their notification preferences. Included below is an example call and response.
Language
Example Input
{"message":{"body":"Simple notification message from my company","user_id":315}}
curl https://www.shout.app/api/v20230615/messages/send_connect_notification -X POST \-u username:password \-d"{\"message\":{\"body\":\"Simple notification message from my company\",\"user_id\":315}}"
require'net/http'require'uri'require'json'uri=URI.parse("https://www.shout.app/api/v20230615/messages/send_connect_notification")uri.query={"message":{"body":"Simple notification message from my company","user_id":315}}request=Net::HTTP::Post.new(uri)request.basic_auth("username","password")request.body=JSON.dump({"message":{"body":"Simple notification message from my company","user_id":315}})req_options={use_ssl: uri.scheme=="https"}response=Net::HTTP.start(uri.hostname,uri.port,req_options)do|http|http.request(request)end# response.code# response.body
importrequestsfromrequests.structuresimportCaseInsensitiveDicturl="https://www.shout.app/api/v20230615/messages/send_connect_notification"headers={"Content-Type":"application/json",}data='{"message":{"body":"Simple notification message from my company","user_id":315}}'response=requests.post(url,headers=headers,data=data,auth=('username','password'))print(response.status_code)
$ch=curl_init();curl_setopt($ch,CURLOPT_URL,'https://www.shout.app/api/v20230615/messages/send_connect_notification');curl_setopt($ch,CURLOPT_RETURNTRANSFER,1);curl_setopt($ch,CURLOPT_POST,1);curl_setopt($ch,CURLOPT_POSTFIELDS,"{\"message\":{\"body\":\"Simple notification message from my company\",\"user_id\":315}}");$headers=array();$headers[]='Content-Type: application/x-www-form-urlencoded';curl_setopt($ch,CURLOPT_USERPWD,'username'.':'.'password');curl_setopt($ch,CURLOPT_HTTPHEADER,$headers);$result=curl_exec($ch);if(curl_errno($ch)){echo'Error:'.curl_error($ch);}curl_close($ch);
importjavax.xml.bind.DatatypeConverter;importjava.io.IOException;importjava.io.InputStream;importjava.io.OutputStreamWriter;importjava.net.HttpURLConnection;importjava.net.URL;importjava.util.Scanner;classMain{publicstaticvoidmain(String[]args)throwsIOException{URLurl=newURL("https://www.shout.app/api/v20230615/messages/send_connect_notification");HttpURLConnectionhttpConn=(HttpURLConnection)url.openConnection();httpConn.setRequestMethod("POST");byte[]message=("username:password").getBytes("UTF-8");StringbasicAuth=DatatypeConverter.printBase64Binary(message);httpConn.setRequestProperty("Authorization","Basic "+basicAuth);httpConn.setDoOutput(true);OutputStreamWriterwriter=newOutputStreamWriter(httpConn.getOutputStream());writer.write("{\"message\":{\"body\":\"Simple notification message from my company\",\"user_id\":315}}");writer.flush();writer.close();httpConn.getOutputStream().close();InputStreamresponseStream=httpConn.getResponseCode()/100==2?httpConn.getInputStream():httpConn.getErrorStream();Scanners=newScanner(responseStream).useDelimiter("\A");Stringresponse=s.hasNext()?s.next():"";System.out.println(response);}}
varrequest=require('request');varheaders={};vardataString='{"message":{"body":"Simple notification message from my company","user_id":315}}';varoptions={url:'https://www.shout.app/api/v20230615/messages/send_connect_notification',method:'POST',headers:headers,body:dataString,auth:{'user':'username','pass':'password'}};functioncallback(error,response,body){if (!error&&response.statusCode==200){console.log(body);}}request(options,callback);
packagemainimport("fmt""io/ioutil""log""net/http""strings")funcmain(){client:=&http.Client{}vardata=strings.NewReader(`{"message":{"body":"Simple notification message from my company","user_id":315}}`)req,err:=http.NewRequest("POST","https://www.shout.app/api/v20230615/messages/send_connect_notification",data)iferr!=nil{log.Fatal(err)}req.SetBasicAuth("username","password")resp,err:=client.Do(req)iferr!=nil{log.Fatal(err)}deferresp.Body.Close()bodyText,err:=ioutil.ReadAll(resp.Body)iferr!=nil{log.Fatal(err)}fmt.Printf("%s\n",bodyText)}
using (var httpClient = new HttpClient())
{
    using (var request = new HttpRequestMessage(new HttpMethod("POST"), "https://www.shout.app/api/v20230615/messages/send_connect_notification"))
    {
        var base64authorization = Convert.ToBase64String(Encoding.ASCII.GetBytes("username:password"));
        request.Headers.TryAddWithoutValidation("Authorization", $"Basic {base64authorization}");


        request.Content = new StringContent({"message":{"body":"Simple notification message from my company","user_id":315}});
        request.Content.Headers.ContentType = MediaTypeHeaderValue.Parse("application/x-www-form-urlencoded");

        var response = await httpClient.SendAsync(request);
    }
}
Example Response
{"id":13330,"body":"Simple notification message from my company","company_id":6,"conversation_id":3910,"created_at":"2023-06-22T14:52:36.274303-06:00","deleted_at":null,"dont_mark_as_open":null,"favorite":false,"favorited_at":null,"object":"message","profile_id":null,"send_at":null,"updated_at":"2023-06-22T14:52:36.274303-06:00"}
Broadcast a Message or Notification to Multiple Connected Accounts
Often times you need to send a notification or a message to multiple connected accounts at the same time. Use the /messages/broadcast_message endpoint to accomplish this quickly and easily. As a reminder a message can be responded to by the connected account (two-way conversation) while a notification cannot (one-way conversation).
Because of the nature of sending push notifications to mobile and desktop devices and browsers, DO NOT create many /messages/send_shout_message or /messages/send_connect_notification calls when sending the same message to multiple recipients. This endpoint will deliver push notifications up to 10 times (10x) faster.
Before You Get Started
If you've come straight here, here are a few things you'll need to do before you start sending notifications to connected accounts:
Make sure you or your organization has Shout Connect enabled on their account. If you're not sure, login to your Shout account and navigate to Settings > Services > Shout Connect. If you aren't able to access the Shout Connect page, reach out to Shout support (for production environments) or Shout Developers (for development environments) and ask to have it enabled for your organization first.
Make sure that you have at least one other shout account that has authorized your Shout Connect account. You can read more about this in the Shout Connect Overview.
Step-By-Step Sending a Message to Connected Accounts
Construct the payload for the Send Broadcast Message api call when you are sending to multiple recipients if you are sending to a single recipient.
Include the API credentials header in your call. Check out the documentation here for more information.
Post to the Send Broadcast Message endpoint.
Sending a message or a notification as a broadcast should be very straight forward. You can indicate either connect_ids or a shout user_ids as recipients. Shout will receive your call, respond, and then create the messages or notifications, post it to the correct conversation for the Connect Account, and then generate push notifications and browser notifications for the recipient(s) (each connected account) according to their notification preferences. Included below are several examples of calls and responses for both broadcasting notifications and shout messages.
Examples of Post /broadcast_messages/send_connect_notification
Using the broadcast messages endpoint with Shout Connect Notifications provides a simple to use interface while ensuring that the messages and push notifications are delivered to devices in the most performant way. Broadcast messages can be sent to many different types of objects in Shout, from orders, lists, tags, and shipping labels. Most Shout Connect integrations will interface exclusively with include_all_connect_users, included_connect_ids, excluded_connect_ids, included_user_ids, and excluded_user_ids.
This endpoint will automatically find the appropriate notification conversation, post a message to the conversation, and generate the push notification(s) to the Shout user's devices and browsers.
Language
Variant
Example Input
{"broadcast_message":{"attachment_urls":["https://cdn.cheapism.com/images/National_Park_Photos.2e16d0ba.fill-1440x605.png"],"body":"A broadcast message using all include and exclude fields","excluded_bot_assignment_ids":324,"excluded_connect_ids":[193,1933],"excluded_order_ids":1,"excluded_profile_ids":770,"excluded_profile_list_ids":1,"excluded_shipping_label_ids":"101 102 103","excluded_tag_ids":62,"excluded_user_ids":[93487,38981],"included_bot_assignment_ids":324,"included_connect_ids":[193,1933],"included_order_ids":1,"included_profile_ids":"770,8384,1938","included_profile_list_ids":1,"included_shipping_label_ids":101,"included_tag_ids":62,"included_user_ids":6299}}
curl https://www.shout.app/api/v20230615/broadcast_messages/send_connect_notification -X POST \-u username:password \-d"{\"broadcast_message\":{\"attachment_urls\":[\"https://cdn.cheapism.com/images/National_Park_Photos.2e16d0ba.fill-1440x605.png\"],\"body\":\"A broadcast message using all include and exclude fields\",\"excluded_bot_assignment_ids\":324,\"excluded_connect_ids\":[193,1933],\"excluded_order_ids\":1,\"excluded_profile_ids\":770,\"excluded_profile_list_ids\":1,\"excluded_shipping_label_ids\":\"101 102 103\",\"excluded_tag_ids\":62,\"excluded_user_ids\":[93487,38981],\"included_bot_assignment_ids\":324,\"included_connect_ids\":[193,1933],\"included_order_ids\":1,\"included_profile_ids\":\"770,8384,1938\",\"included_profile_list_ids\":1,\"included_shipping_label_ids\":101,\"included_tag_ids\":62,\"included_user_ids\":6299}}"
require'net/http'require'uri'require'json'uri=URI.parse("https://www.shout.app/api/v20230615/broadcast_messages/send_connect_notification")uri.query={"broadcast_message":{"attachment_urls":["https://cdn.cheapism.com/images/National_Park_Photos.2e16d0ba.fill-1440x605.png"],"body":"A broadcast message using all include and exclude fields","excluded_bot_assignment_ids":324,"excluded_connect_ids":[193,1933],"excluded_order_ids":1,"excluded_profile_ids":770,"excluded_profile_list_ids":1,"excluded_shipping_label_ids":"101 102 103","excluded_tag_ids":62,"excluded_user_ids":[93487,38981],"included_bot_assignment_ids":324,"included_connect_ids":[193,1933],"included_order_ids":1,"included_profile_ids":"770,8384,1938","included_profile_list_ids":1,"included_shipping_label_ids":101,"included_tag_ids":62,"included_user_ids":6299}}request=Net::HTTP::Post.new(uri)request.basic_auth("username","password")request.body=JSON.dump({"broadcast_message":{"attachment_urls":["https://cdn.cheapism.com/images/National_Park_Photos.2e16d0ba.fill-1440x605.png"],"body":"A broadcast message using all include and exclude fields","excluded_bot_assignment_ids":324,"excluded_connect_ids":[193,1933],"excluded_order_ids":1,"excluded_profile_ids":770,"excluded_profile_list_ids":1,"excluded_shipping_label_ids":"101 102 103","excluded_tag_ids":62,"excluded_user_ids":[93487,38981],"included_bot_assignment_ids":324,"included_connect_ids":[193,1933],"included_order_ids":1,"included_profile_ids":"770,8384,1938","included_profile_list_ids":1,"included_shipping_label_ids":101,"included_tag_ids":62,"included_user_ids":6299}})req_options={use_ssl: uri.scheme=="https"}response=Net::HTTP.start(uri.hostname,uri.port,req_options)do|http|http.request(request)end# response.code# response.body
importrequestsfromrequests.structuresimportCaseInsensitiveDicturl="https://www.shout.app/api/v20230615/broadcast_messages/send_connect_notification"headers={"Content-Type":"application/json",}data='{"broadcast_message":{"attachment_urls":["https://cdn.cheapism.com/images/National_Park_Photos.2e16d0ba.fill-1440x605.png"],"body":"A broadcast message using all include and exclude fields","excluded_bot_assignment_ids":324,"excluded_connect_ids":[193,1933],"excluded_order_ids":1,"excluded_profile_ids":770,"excluded_profile_list_ids":1,"excluded_shipping_label_ids":"101 102 103","excluded_tag_ids":62,"excluded_user_ids":[93487,38981],"included_bot_assignment_ids":324,"included_connect_ids":[193,1933],"included_order_ids":1,"included_profile_ids":"770,8384,1938","included_profile_list_ids":1,"included_shipping_label_ids":101,"included_tag_ids":62,"included_user_ids":6299}}'response=requests.post(url,headers=headers,data=data,auth=('username','password'))print(response.status_code)
$ch=curl_init();curl_setopt($ch,CURLOPT_URL,'https://www.shout.app/api/v20230615/broadcast_messages/send_connect_notification');curl_setopt($ch,CURLOPT_RETURNTRANSFER,1);curl_setopt($ch,CURLOPT_POST,1);curl_setopt($ch,CURLOPT_POSTFIELDS,"{\"broadcast_message\":{\"attachment_urls\":[\"https://cdn.cheapism.com/images/National_Park_Photos.2e16d0ba.fill-1440x605.png\"],\"body\":\"A broadcast message using all include and exclude fields\",\"excluded_bot_assignment_ids\":324,\"excluded_connect_ids\":[193,1933],\"excluded_order_ids\":1,\"excluded_profile_ids\":770,\"excluded_profile_list_ids\":1,\"excluded_shipping_label_ids\":\"101 102 103\",\"excluded_tag_ids\":62,\"excluded_user_ids\":[93487,38981],\"included_bot_assignment_ids\":324,\"included_connect_ids\":[193,1933],\"included_order_ids\":1,\"included_profile_ids\":\"770,8384,1938\",\"included_profile_list_ids\":1,\"included_shipping_label_ids\":101,\"included_tag_ids\":62,\"included_user_ids\":6299}}");$headers=array();$headers[]='Content-Type: application/x-www-form-urlencoded';curl_setopt($ch,CURLOPT_USERPWD,'username'.':'.'password');curl_setopt($ch,CURLOPT_HTTPHEADER,$headers);$result=curl_exec($ch);if(curl_errno($ch)){echo'Error:'.curl_error($ch);}curl_close($ch);
importjavax.xml.bind.DatatypeConverter;importjava.io.IOException;importjava.io.InputStream;importjava.io.OutputStreamWriter;importjava.net.HttpURLConnection;importjava.net.URL;importjava.util.Scanner;classMain{publicstaticvoidmain(String[]args)throwsIOException{URLurl=newURL("https://www.shout.app/api/v20230615/broadcast_messages/send_connect_notification");HttpURLConnectionhttpConn=(HttpURLConnection)url.openConnection();httpConn.setRequestMethod("POST");byte[]message=("username:password").getBytes("UTF-8");StringbasicAuth=DatatypeConverter.printBase64Binary(message);httpConn.setRequestProperty("Authorization","Basic "+basicAuth);httpConn.setDoOutput(true);OutputStreamWriterwriter=newOutputStreamWriter(httpConn.getOutputStream());writer.write("{\"broadcast_message\":{\"attachment_urls\":[\"https://cdn.cheapism.com/images/National_Park_Photos.2e16d0ba.fill-1440x605.png\"],\"body\":\"A broadcast message using all include and exclude fields\",\"excluded_bot_assignment_ids\":324,\"excluded_connect_ids\":[193,1933],\"excluded_order_ids\":1,\"excluded_profile_ids\":770,\"excluded_profile_list_ids\":1,\"excluded_shipping_label_ids\":\"101 102 103\",\"excluded_tag_ids\":62,\"excluded_user_ids\":[93487,38981],\"included_bot_assignment_ids\":324,\"included_connect_ids\":[193,1933],\"included_order_ids\":1,\"included_profile_ids\":\"770,8384,1938\",\"included_profile_list_ids\":1,\"included_shipping_label_ids\":101,\"included_tag_ids\":62,\"included_user_ids\":6299}}");writer.flush();writer.close();httpConn.getOutputStream().close();InputStreamresponseStream=httpConn.getResponseCode()/100==2?httpConn.getInputStream():httpConn.getErrorStream();Scanners=newScanner(responseStream).useDelimiter("\A");Stringresponse=s.hasNext()?s.next():"";System.out.println(response);}}
varrequest=require('request');varheaders={};vardataString='{"broadcast_message":{"attachment_urls":["https://cdn.cheapism.com/images/National_Park_Photos.2e16d0ba.fill-1440x605.png"],"body":"A broadcast message using all include and exclude fields","excluded_bot_assignment_ids":324,"excluded_connect_ids":[193,1933],"excluded_order_ids":1,"excluded_profile_ids":770,"excluded_profile_list_ids":1,"excluded_shipping_label_ids":"101 102 103","excluded_tag_ids":62,"excluded_user_ids":[93487,38981],"included_bot_assignment_ids":324,"included_connect_ids":[193,1933],"included_order_ids":1,"included_profile_ids":"770,8384,1938","included_profile_list_ids":1,"included_shipping_label_ids":101,"included_tag_ids":62,"included_user_ids":6299}}';varoptions={url:'https://www.shout.app/api/v20230615/broadcast_messages/send_connect_notification',method:'POST',headers:headers,body:dataString,auth:{'user':'username','pass':'password'}};functioncallback(error,response,body){if (!error&&response.statusCode==200){console.log(body);}}request(options,callback);
packagemainimport("fmt""io/ioutil""log""net/http""strings")funcmain(){client:=&http.Client{}vardata=strings.NewReader(`{"broadcast_message":{"attachment_urls":["https://cdn.cheapism.com/images/National_Park_Photos.2e16d0ba.fill-1440x605.png"],"body":"A broadcast message using all include and exclude fields","excluded_bot_assignment_ids":324,"excluded_connect_ids":[193,1933],"excluded_order_ids":1,"excluded_profile_ids":770,"excluded_profile_list_ids":1,"excluded_shipping_label_ids":"101 102 103","excluded_tag_ids":62,"excluded_user_ids":[93487,38981],"included_bot_assignment_ids":324,"included_connect_ids":[193,1933],"included_order_ids":1,"included_profile_ids":"770,8384,1938","included_profile_list_ids":1,"included_shipping_label_ids":101,"included_tag_ids":62,"included_user_ids":6299}}`)req,err:=http.NewRequest("POST","https://www.shout.app/api/v20230615/broadcast_messages/send_connect_notification",data)iferr!=nil{log.Fatal(err)}req.SetBasicAuth("username","password")resp,err:=client.Do(req)iferr!=nil{log.Fatal(err)}deferresp.Body.Close()bodyText,err:=ioutil.ReadAll(resp.Body)iferr!=nil{log.Fatal(err)}fmt.Printf("%s\n",bodyText)}
using (var httpClient = new HttpClient())
{
    using (var request = new HttpRequestMessage(new HttpMethod("POST"), "https://www.shout.app/api/v20230615/broadcast_messages/send_connect_notification"))
    {
        var base64authorization = Convert.ToBase64String(Encoding.ASCII.GetBytes("username:password"));
        request.Headers.TryAddWithoutValidation("Authorization", $"Basic {base64authorization}");


        request.Content = new StringContent({"broadcast_message":{"attachment_urls":["https://cdn.cheapism.com/images/National_Park_Photos.2e16d0ba.fill-1440x605.png"],"body":"A broadcast message using all include and exclude fields","excluded_bot_assignment_ids":324,"excluded_connect_ids":[193,1933],"excluded_order_ids":1,"excluded_profile_ids":770,"excluded_profile_list_ids":1,"excluded_shipping_label_ids":"101 102 103","excluded_tag_ids":62,"excluded_user_ids":[93487,38981],"included_bot_assignment_ids":324,"included_connect_ids":[193,1933],"included_order_ids":1,"included_profile_ids":"770,8384,1938","included_profile_list_ids":1,"included_shipping_label_ids":101,"included_tag_ids":62,"included_user_ids":6299}});
        request.Content.Headers.ContentType = MediaTypeHeaderValue.Parse("application/x-www-form-urlencoded");

        var response = await httpClient.SendAsync(request);
    }
}
Example Response
{"id":253,"body":"A broadcast message using all include and exclude fields","company_id":6,"created_at":"2023-06-22T20:58:53.722877-06:00","dont_mark_as_open":false,"object":"broadcast_message","outlet_type":"local","send_at":null,"updated_at":"2023-06-22T20:58:53.722877-06:00"}
Example Input
{"broadcast_message":{"body":"A notification that goes to all of my Shout Connect users who are Shout users","include_all_connect_users":true}}
curl https://www.shout.app/api/v20230615/broadcast_messages/send_connect_notification -X POST \-u username:password \-d"{\"broadcast_message\":{\"body\":\"A notification that goes to all of my Shout Connect users who are Shout users\",\"include_all_connect_users\":true}}"
require'net/http'require'uri'require'json'uri=URI.parse("https://www.shout.app/api/v20230615/broadcast_messages/send_connect_notification")uri.query={"broadcast_message":{"body":"A notification that goes to all of my Shout Connect users who are Shout users","include_all_connect_users":true}}request=Net::HTTP::Post.new(uri)request.basic_auth("username","password")request.body=JSON.dump({"broadcast_message":{"body":"A notification that goes to all of my Shout Connect users who are Shout users","include_all_connect_users":true}})req_options={use_ssl: uri.scheme=="https"}response=Net::HTTP.start(uri.hostname,uri.port,req_options)do|http|http.request(request)end# response.code# response.body
importrequestsfromrequests.structuresimportCaseInsensitiveDicturl="https://www.shout.app/api/v20230615/broadcast_messages/send_connect_notification"headers={"Content-Type":"application/json",}data='{"broadcast_message":{"body":"A notification that goes to all of my Shout Connect users who are Shout users","include_all_connect_users":true}}'response=requests.post(url,headers=headers,data=data,auth=('username','password'))print(response.status_code)
$ch=curl_init();curl_setopt($ch,CURLOPT_URL,'https://www.shout.app/api/v20230615/broadcast_messages/send_connect_notification');curl_setopt($ch,CURLOPT_RETURNTRANSFER,1);curl_setopt($ch,CURLOPT_POST,1);curl_setopt($ch,CURLOPT_POSTFIELDS,"{\"broadcast_message\":{\"body\":\"A notification that goes to all of my Shout Connect users who are Shout users\",\"include_all_connect_users\":true}}");$headers=array();$headers[]='Content-Type: application/x-www-form-urlencoded';curl_setopt($ch,CURLOPT_USERPWD,'username'.':'.'password');curl_setopt($ch,CURLOPT_HTTPHEADER,$headers);$result=curl_exec($ch);if(curl_errno($ch)){echo'Error:'.curl_error($ch);}curl_close($ch);
importjavax.xml.bind.DatatypeConverter;importjava.io.IOException;importjava.io.InputStream;importjava.io.OutputStreamWriter;importjava.net.HttpURLConnection;importjava.net.URL;importjava.util.Scanner;classMain{publicstaticvoidmain(String[]args)throwsIOException{URLurl=newURL("https://www.shout.app/api/v20230615/broadcast_messages/send_connect_notification");HttpURLConnectionhttpConn=(HttpURLConnection)url.openConnection();httpConn.setRequestMethod("POST");byte[]message=("username:password").getBytes("UTF-8");StringbasicAuth=DatatypeConverter.printBase64Binary(message);httpConn.setRequestProperty("Authorization","Basic "+basicAuth);httpConn.setDoOutput(true);OutputStreamWriterwriter=newOutputStreamWriter(httpConn.getOutputStream());writer.write("{\"broadcast_message\":{\"body\":\"A notification that goes to all of my Shout Connect users who are Shout users\",\"include_all_connect_users\":true}}");writer.flush();writer.close();httpConn.getOutputStream().close();InputStreamresponseStream=httpConn.getResponseCode()/100==2?httpConn.getInputStream():httpConn.getErrorStream();Scanners=newScanner(responseStream).useDelimiter("\A");Stringresponse=s.hasNext()?s.next():"";System.out.println(response);}}
varrequest=require('request');varheaders={};vardataString='{"broadcast_message":{"body":"A notification that goes to all of my Shout Connect users who are Shout users","include_all_connect_users":true}}';varoptions={url:'https://www.shout.app/api/v20230615/broadcast_messages/send_connect_notification',method:'POST',headers:headers,body:dataString,auth:{'user':'username','pass':'password'}};functioncallback(error,response,body){if (!error&&response.statusCode==200){console.log(body);}}request(options,callback);
packagemainimport("fmt""io/ioutil""log""net/http""strings")funcmain(){client:=&http.Client{}vardata=strings.NewReader(`{"broadcast_message":{"body":"A notification that goes to all of my Shout Connect users who are Shout users","include_all_connect_users":true}}`)req,err:=http.NewRequest("POST","https://www.shout.app/api/v20230615/broadcast_messages/send_connect_notification",data)iferr!=nil{log.Fatal(err)}req.SetBasicAuth("username","password")resp,err:=client.Do(req)iferr!=nil{log.Fatal(err)}deferresp.Body.Close()bodyText,err:=ioutil.ReadAll(resp.Body)iferr!=nil{log.Fatal(err)}fmt.Printf("%s\n",bodyText)}
using (var httpClient = new HttpClient())
{
    using (var request = new HttpRequestMessage(new HttpMethod("POST"), "https://www.shout.app/api/v20230615/broadcast_messages/send_connect_notification"))
    {
        var base64authorization = Convert.ToBase64String(Encoding.ASCII.GetBytes("username:password"));
        request.Headers.TryAddWithoutValidation("Authorization", $"Basic {base64authorization}");


        request.Content = new StringContent({"broadcast_message":{"body":"A notification that goes to all of my Shout Connect users who are Shout users","include_all_connect_users":true}});
        request.Content.Headers.ContentType = MediaTypeHeaderValue.Parse("application/x-www-form-urlencoded");

        var response = await httpClient.SendAsync(request);
    }
}
Example Response
{"id":254,"body":"A notification that goes to all of my Shout Connect users who are Shout users","company_id":6,"created_at":"2023-06-22T20:58:53.722877-06:00","dont_mark_as_open":false,"object":"broadcast_message","outlet_type":"local","send_at":null,"updated_at":"2023-06-22T20:58:53.722877-06:00"}
Example Input
{"broadcast_message":{"body":"Quiet notification that doesn't open the recipient's notifications conversation","included_connect_ids":"1a2b3c","dont_mark_as_open":true}}
curl https://www.shout.app/api/v20230615/broadcast_messages/send_connect_notification -X POST \-u username:password \-d"{\"broadcast_message\":{\"body\":\"Quiet notification that doesn't open the recipient's notifications conversation\",\"included_connect_ids\":\"1a2b3c\",\"dont_mark_as_open\":true}}"
require'net/http'require'uri'require'json'uri=URI.parse("https://www.shout.app/api/v20230615/broadcast_messages/send_connect_notification")uri.query={"broadcast_message":{"body":"Quiet notification that doesn't open the recipient's notifications conversation","included_connect_ids":"1a2b3c","dont_mark_as_open":true}}request=Net::HTTP::Post.new(uri)request.basic_auth("username","password")request.body=JSON.dump({"broadcast_message":{"body":"Quiet notification that doesn't open the recipient's notifications conversation","included_connect_ids":"1a2b3c","dont_mark_as_open":true}})req_options={use_ssl: uri.scheme=="https"}response=Net::HTTP.start(uri.hostname,uri.port,req_options)do|http|http.request(request)end# response.code# response.body
importrequestsfromrequests.structuresimportCaseInsensitiveDicturl="https://www.shout.app/api/v20230615/broadcast_messages/send_connect_notification"headers={"Content-Type":"application/json",}data='{"broadcast_message":{"body":"Quiet notification that doesn'topentherecipient's notifications conversation","included_connect_ids":"1a2b3c","dont_mark_as_open":true}}'response=requests.post(url,headers=headers,data=data,auth=('username','password'))print(response.status_code)
$ch=curl_init();curl_setopt($ch,CURLOPT_URL,'https://www.shout.app/api/v20230615/broadcast_messages/send_connect_notification');curl_setopt($ch,CURLOPT_RETURNTRANSFER,1);curl_setopt($ch,CURLOPT_POST,1);curl_setopt($ch,CURLOPT_POSTFIELDS,"{\"broadcast_message\":{\"body\":\"Quiet notification that doesn't open the recipient's notifications conversation\",\"included_connect_ids\":\"1a2b3c\",\"dont_mark_as_open\":true}}");$headers=array();$headers[]='Content-Type: application/x-www-form-urlencoded';curl_setopt($ch,CURLOPT_USERPWD,'username'.':'.'password');curl_setopt($ch,CURLOPT_HTTPHEADER,$headers);$result=curl_exec($ch);if(curl_errno($ch)){echo'Error:'.curl_error($ch);}curl_close($ch);
importjavax.xml.bind.DatatypeConverter;importjava.io.IOException;importjava.io.InputStream;importjava.io.OutputStreamWriter;importjava.net.HttpURLConnection;importjava.net.URL;importjava.util.Scanner;classMain{publicstaticvoidmain(String[]args)throwsIOException{URLurl=newURL("https://www.shout.app/api/v20230615/broadcast_messages/send_connect_notification");HttpURLConnectionhttpConn=(HttpURLConnection)url.openConnection();httpConn.setRequestMethod("POST");byte[]message=("username:password").getBytes("UTF-8");StringbasicAuth=DatatypeConverter.printBase64Binary(message);httpConn.setRequestProperty("Authorization","Basic "+basicAuth);httpConn.setDoOutput(true);OutputStreamWriterwriter=newOutputStreamWriter(httpConn.getOutputStream());writer.write("{\"broadcast_message\":{\"body\":\"Quiet notification that doesn't open the recipient's notifications conversation\",\"included_connect_ids\":\"1a2b3c\",\"dont_mark_as_open\":true}}");writer.flush();writer.close();httpConn.getOutputStream().close();InputStreamresponseStream=httpConn.getResponseCode()/100==2?httpConn.getInputStream():httpConn.getErrorStream();Scanners=newScanner(responseStream).useDelimiter("\A");Stringresponse=s.hasNext()?s.next():"";System.out.println(response);}}
varrequest=require('request');varheaders={};vardataString='{"broadcast_message":{"body":"Quiet notification that doesn'topentherecipient's notifications conversation","included_connect_ids":"1a2b3c","dont_mark_as_open":true}}';varoptions={url:'https://www.shout.app/api/v20230615/broadcast_messages/send_connect_notification',method:'POST',headers:headers,body:dataString,auth:{'user':'username','pass':'password'}};functioncallback(error,response,body){if (!error&&response.statusCode==200){console.log(body);}}request(options,callback);
packagemainimport("fmt""io/ioutil""log""net/http""strings")funcmain(){client:=&http.Client{}vardata=strings.NewReader(`{"broadcast_message":{"body":"Quiet notification that doesn't open the recipient's notifications conversation","included_connect_ids":"1a2b3c","dont_mark_as_open":true}}`)req,err:=http.NewRequest("POST","https://www.shout.app/api/v20230615/broadcast_messages/send_connect_notification",data)iferr!=nil{log.Fatal(err)}req.SetBasicAuth("username","password")resp,err:=client.Do(req)iferr!=nil{log.Fatal(err)}deferresp.Body.Close()bodyText,err:=ioutil.ReadAll(resp.Body)iferr!=nil{log.Fatal(err)}fmt.Printf("%s\n",bodyText)}
using (var httpClient = new HttpClient())
{
    using (var request = new HttpRequestMessage(new HttpMethod("POST"), "https://www.shout.app/api/v20230615/broadcast_messages/send_connect_notification"))
    {
        var base64authorization = Convert.ToBase64String(Encoding.ASCII.GetBytes("username:password"));
        request.Headers.TryAddWithoutValidation("Authorization", $"Basic {base64authorization}");


        request.Content = new StringContent({"broadcast_message":{"body":"Quiet notification that doesn't open the recipient's notifications conversation","included_connect_ids":"1a2b3c","dont_mark_as_open":true}});
        request.Content.Headers.ContentType = MediaTypeHeaderValue.Parse("application/x-www-form-urlencoded");

        var response = await httpClient.SendAsync(request);
    }
}
Example Response
{"id":255,"body":"Quiet notification that doesn't open the recipient's notifications conversation","company_id":6,"created_at":"2023-06-22T20:58:53.722877-06:00","dont_mark_as_open":true,"object":"broadcast_message","outlet_type":"local","send_at":null,"updated_at":"2023-06-22T20:58:53.722877-06:00"}
Example Input
{"broadcast_message":{"body":"Notify a Shout user who is a Connect user","included_connect_ids":"1a2b3c","dont_mark_as_open":true}}
curl https://www.shout.app/api/v20230615/broadcast_messages/send_connect_notification -X POST \-u username:password \-d"{\"broadcast_message\":{\"body\":\"Notify a Shout user who is a Connect user\",\"included_connect_ids\":\"1a2b3c\",\"dont_mark_as_open\":true}}"
require'net/http'require'uri'require'json'uri=URI.parse("https://www.shout.app/api/v20230615/broadcast_messages/send_connect_notification")uri.query={"broadcast_message":{"body":"Notify a Shout user who is a Connect user","included_connect_ids":"1a2b3c","dont_mark_as_open":true}}request=Net::HTTP::Post.new(uri)request.basic_auth("username","password")request.body=JSON.dump({"broadcast_message":{"body":"Notify a Shout user who is a Connect user","included_connect_ids":"1a2b3c","dont_mark_as_open":true}})req_options={use_ssl: uri.scheme=="https"}response=Net::HTTP.start(uri.hostname,uri.port,req_options)do|http|http.request(request)end# response.code# response.body
importrequestsfromrequests.structuresimportCaseInsensitiveDicturl="https://www.shout.app/api/v20230615/broadcast_messages/send_connect_notification"headers={"Content-Type":"application/json",}data='{"broadcast_message":{"body":"Notify a Shout user who is a Connect user","included_connect_ids":"1a2b3c","dont_mark_as_open":true}}'response=requests.post(url,headers=headers,data=data,auth=('username','password'))print(response.status_code)
$ch=curl_init();curl_setopt($ch,CURLOPT_URL,'https://www.shout.app/api/v20230615/broadcast_messages/send_connect_notification');curl_setopt($ch,CURLOPT_RETURNTRANSFER,1);curl_setopt($ch,CURLOPT_POST,1);curl_setopt($ch,CURLOPT_POSTFIELDS,"{\"broadcast_message\":{\"body\":\"Notify a Shout user who is a Connect user\",\"included_connect_ids\":\"1a2b3c\",\"dont_mark_as_open\":true}}");$headers=array();$headers[]='Content-Type: application/x-www-form-urlencoded';curl_setopt($ch,CURLOPT_USERPWD,'username'.':'.'password');curl_setopt($ch,CURLOPT_HTTPHEADER,$headers);$result=curl_exec($ch);if(curl_errno($ch)){echo'Error:'.curl_error($ch);}curl_close($ch);
importjavax.xml.bind.DatatypeConverter;importjava.io.IOException;importjava.io.InputStream;importjava.io.OutputStreamWriter;importjava.net.HttpURLConnection;importjava.net.URL;importjava.util.Scanner;classMain{publicstaticvoidmain(String[]args)throwsIOException{URLurl=newURL("https://www.shout.app/api/v20230615/broadcast_messages/send_connect_notification");HttpURLConnectionhttpConn=(HttpURLConnection)url.openConnection();httpConn.setRequestMethod("POST");byte[]message=("username:password").getBytes("UTF-8");StringbasicAuth=DatatypeConverter.printBase64Binary(message);httpConn.setRequestProperty("Authorization","Basic "+basicAuth);httpConn.setDoOutput(true);OutputStreamWriterwriter=newOutputStreamWriter(httpConn.getOutputStream());writer.write("{\"broadcast_message\":{\"body\":\"Notify a Shout user who is a Connect user\",\"included_connect_ids\":\"1a2b3c\",\"dont_mark_as_open\":true}}");writer.flush();writer.close();httpConn.getOutputStream().close();InputStreamresponseStream=httpConn.getResponseCode()/100==2?httpConn.getInputStream():httpConn.getErrorStream();Scanners=newScanner(responseStream).useDelimiter("\A");Stringresponse=s.hasNext()?s.next():"";System.out.println(response);}}
varrequest=require('request');varheaders={};vardataString='{"broadcast_message":{"body":"Notify a Shout user who is a Connect user","included_connect_ids":"1a2b3c","dont_mark_as_open":true}}';varoptions={url:'https://www.shout.app/api/v20230615/broadcast_messages/send_connect_notification',method:'POST',headers:headers,body:dataString,auth:{'user':'username','pass':'password'}};functioncallback(error,response,body){if (!error&&response.statusCode==200){console.log(body);}}request(options,callback);
packagemainimport("fmt""io/ioutil""log""net/http""strings")funcmain(){client:=&http.Client{}vardata=strings.NewReader(`{"broadcast_message":{"body":"Notify a Shout user who is a Connect user","included_connect_ids":"1a2b3c","dont_mark_as_open":true}}`)req,err:=http.NewRequest("POST","https://www.shout.app/api/v20230615/broadcast_messages/send_connect_notification",data)iferr!=nil{log.Fatal(err)}req.SetBasicAuth("username","password")resp,err:=client.Do(req)iferr!=nil{log.Fatal(err)}deferresp.Body.Close()bodyText,err:=ioutil.ReadAll(resp.Body)iferr!=nil{log.Fatal(err)}fmt.Printf("%s\n",bodyText)}
using (var httpClient = new HttpClient())
{
    using (var request = new HttpRequestMessage(new HttpMethod("POST"), "https://www.shout.app/api/v20230615/broadcast_messages/send_connect_notification"))
    {
        var base64authorization = Convert.ToBase64String(Encoding.ASCII.GetBytes("username:password"));
        request.Headers.TryAddWithoutValidation("Authorization", $"Basic {base64authorization}");


        request.Content = new StringContent({"broadcast_message":{"body":"Notify a Shout user who is a Connect user","included_connect_ids":"1a2b3c","dont_mark_as_open":true}});
        request.Content.Headers.ContentType = MediaTypeHeaderValue.Parse("application/x-www-form-urlencoded");

        var response = await httpClient.SendAsync(request);
    }
}
Example Response
{"id":256,"body":"Notify a Shout user who is a Connect user","company_id":6,"created_at":"2023-06-22T20:58:53.722877-06:00","dont_mark_as_open":true,"object":"broadcast_message","outlet_type":"local","send_at":null,"updated_at":"2023-06-22T20:58:53.722877-06:00"}
Examples of Post /broadcast_messages/send_shout_message
Using the broadcast messages endpoint with Shout Connect Messages provides a simple to use interface while ensuring that the messages and push notifications are delivered to devices in the most performant way. Broadcast messages can be sent to many different types of objects in Shout, from orders, lists, tags, and shipping labels. Most Shout Connect integrations will interface exclusively with include_all_connect_users, included_connect_ids, excluded_connect_ids, included_user_ids, and excluded_user_ids.
This endpoint will automatically find the appropriate direct message conversation, post a message to the conversation, and generate the push notification(s) to the Shout user's devices and browsers.
Language
Variant
Example Input
{"broadcast_message":{"attachment_urls":["https://cdn.cheapism.com/images/National_Park_Photos.2e16d0ba.fill-1440x605.png"],"body":"A broadcast message using all include and exclude fields","excluded_bot_assignment_ids":324,"excluded_order_ids":1,"excluded_profile_ids":770,"excluded_profile_list_ids":1,"excluded_shipping_label_ids":"101 102 103","excluded_tag_ids":62,"excluded_user_ids":[93487,38981],"included_bot_assignment_ids":324,"included_order_ids":1,"included_profile_ids":"770,8384,1938","included_profile_list_ids":1,"included_shipping_label_ids":101,"included_tag_ids":62,"included_user_ids":6299}}
curl https://www.shout.app/api/v20230615/broadcast_messages/send_shout_message -X POST \-u username:password \-d"{\"broadcast_message\":{\"attachment_urls\":[\"https://cdn.cheapism.com/images/National_Park_Photos.2e16d0ba.fill-1440x605.png\"],\"body\":\"A broadcast message using all include and exclude fields\",\"excluded_bot_assignment_ids\":324,\"excluded_order_ids\":1,\"excluded_profile_ids\":770,\"excluded_profile_list_ids\":1,\"excluded_shipping_label_ids\":\"101 102 103\",\"excluded_tag_ids\":62,\"excluded_user_ids\":[93487,38981],\"included_bot_assignment_ids\":324,\"included_order_ids\":1,\"included_profile_ids\":\"770,8384,1938\",\"included_profile_list_ids\":1,\"included_shipping_label_ids\":101,\"included_tag_ids\":62,\"included_user_ids\":6299}}"
require'net/http'require'uri'require'json'uri=URI.parse("https://www.shout.app/api/v20230615/broadcast_messages/send_shout_message")uri.query={"broadcast_message":{"attachment_urls":["https://cdn.cheapism.com/images/National_Park_Photos.2e16d0ba.fill-1440x605.png"],"body":"A broadcast message using all include and exclude fields","excluded_bot_assignment_ids":324,"excluded_order_ids":1,"excluded_profile_ids":770,"excluded_profile_list_ids":1,"excluded_shipping_label_ids":"101 102 103","excluded_tag_ids":62,"excluded_user_ids":[93487,38981],"included_bot_assignment_ids":324,"included_order_ids":1,"included_profile_ids":"770,8384,1938","included_profile_list_ids":1,"included_shipping_label_ids":101,"included_tag_ids":62,"included_user_ids":6299}}request=Net::HTTP::Post.new(uri)request.basic_auth("username","password")request.body=JSON.dump({"broadcast_message":{"attachment_urls":["https://cdn.cheapism.com/images/National_Park_Photos.2e16d0ba.fill-1440x605.png"],"body":"A broadcast message using all include and exclude fields","excluded_bot_assignment_ids":324,"excluded_order_ids":1,"excluded_profile_ids":770,"excluded_profile_list_ids":1,"excluded_shipping_label_ids":"101 102 103","excluded_tag_ids":62,"excluded_user_ids":[93487,38981],"included_bot_assignment_ids":324,"included_order_ids":1,"included_profile_ids":"770,8384,1938","included_profile_list_ids":1,"included_shipping_label_ids":101,"included_tag_ids":62,"included_user_ids":6299}})req_options={use_ssl: uri.scheme=="https"}response=Net::HTTP.start(uri.hostname,uri.port,req_options)do|http|http.request(request)end# response.code# response.body
importrequestsfromrequests.structuresimportCaseInsensitiveDicturl="https://www.shout.app/api/v20230615/broadcast_messages/send_shout_message"headers={"Content-Type":"application/json",}data='{"broadcast_message":{"attachment_urls":["https://cdn.cheapism.com/images/National_Park_Photos.2e16d0ba.fill-1440x605.png"],"body":"A broadcast message using all include and exclude fields","excluded_bot_assignment_ids":324,"excluded_order_ids":1,"excluded_profile_ids":770,"excluded_profile_list_ids":1,"excluded_shipping_label_ids":"101 102 103","excluded_tag_ids":62,"excluded_user_ids":[93487,38981],"included_bot_assignment_ids":324,"included_order_ids":1,"included_profile_ids":"770,8384,1938","included_profile_list_ids":1,"included_shipping_label_ids":101,"included_tag_ids":62,"included_user_ids":6299}}'response=requests.post(url,headers=headers,data=data,auth=('username','password'))print(response.status_code)
$ch=curl_init();curl_setopt($ch,CURLOPT_URL,'https://www.shout.app/api/v20230615/broadcast_messages/send_shout_message');curl_setopt($ch,CURLOPT_RETURNTRANSFER,1);curl_setopt($ch,CURLOPT_POST,1);curl_setopt($ch,CURLOPT_POSTFIELDS,"{\"broadcast_message\":{\"attachment_urls\":[\"https://cdn.cheapism.com/images/National_Park_Photos.2e16d0ba.fill-1440x605.png\"],\"body\":\"A broadcast message using all include and exclude fields\",\"excluded_bot_assignment_ids\":324,\"excluded_order_ids\":1,\"excluded_profile_ids\":770,\"excluded_profile_list_ids\":1,\"excluded_shipping_label_ids\":\"101 102 103\",\"excluded_tag_ids\":62,\"excluded_user_ids\":[93487,38981],\"included_bot_assignment_ids\":324,\"included_order_ids\":1,\"included_profile_ids\":\"770,8384,1938\",\"included_profile_list_ids\":1,\"included_shipping_label_ids\":101,\"included_tag_ids\":62,\"included_user_ids\":6299}}");$headers=array();$headers[]='Content-Type: application/x-www-form-urlencoded';curl_setopt($ch,CURLOPT_USERPWD,'username'.':'.'password');curl_setopt($ch,CURLOPT_HTTPHEADER,$headers);$result=curl_exec($ch);if(curl_errno($ch)){echo'Error:'.curl_error($ch);}curl_close($ch);
importjavax.xml.bind.DatatypeConverter;importjava.io.IOException;importjava.io.InputStream;importjava.io.OutputStreamWriter;importjava.net.HttpURLConnection;importjava.net.URL;importjava.util.Scanner;classMain{publicstaticvoidmain(String[]args)throwsIOException{URLurl=newURL("https://www.shout.app/api/v20230615/broadcast_messages/send_shout_message");HttpURLConnectionhttpConn=(HttpURLConnection)url.openConnection();httpConn.setRequestMethod("POST");byte[]message=("username:password").getBytes("UTF-8");StringbasicAuth=DatatypeConverter.printBase64Binary(message);httpConn.setRequestProperty("Authorization","Basic "+basicAuth);httpConn.setDoOutput(true);OutputStreamWriterwriter=newOutputStreamWriter(httpConn.getOutputStream());writer.write("{\"broadcast_message\":{\"attachment_urls\":[\"https://cdn.cheapism.com/images/National_Park_Photos.2e16d0ba.fill-1440x605.png\"],\"body\":\"A broadcast message using all include and exclude fields\",\"excluded_bot_assignment_ids\":324,\"excluded_order_ids\":1,\"excluded_profile_ids\":770,\"excluded_profile_list_ids\":1,\"excluded_shipping_label_ids\":\"101 102 103\",\"excluded_tag_ids\":62,\"excluded_user_ids\":[93487,38981],\"included_bot_assignment_ids\":324,\"included_order_ids\":1,\"included_profile_ids\":\"770,8384,1938\",\"included_profile_list_ids\":1,\"included_shipping_label_ids\":101,\"included_tag_ids\":62,\"included_user_ids\":6299}}");writer.flush();writer.close();httpConn.getOutputStream().close();InputStreamresponseStream=httpConn.getResponseCode()/100==2?httpConn.getInputStream():httpConn.getErrorStream();Scanners=newScanner(responseStream).useDelimiter("\A");Stringresponse=s.hasNext()?s.next():"";System.out.println(response);}}
varrequest=require('request');varheaders={};vardataString='{"broadcast_message":{"attachment_urls":["https://cdn.cheapism.com/images/National_Park_Photos.2e16d0ba.fill-1440x605.png"],"body":"A broadcast message using all include and exclude fields","excluded_bot_assignment_ids":324,"excluded_order_ids":1,"excluded_profile_ids":770,"excluded_profile_list_ids":1,"excluded_shipping_label_ids":"101 102 103","excluded_tag_ids":62,"excluded_user_ids":[93487,38981],"included_bot_assignment_ids":324,"included_order_ids":1,"included_profile_ids":"770,8384,1938","included_profile_list_ids":1,"included_shipping_label_ids":101,"included_tag_ids":62,"included_user_ids":6299}}';varoptions={url:'https://www.shout.app/api/v20230615/broadcast_messages/send_shout_message',method:'POST',headers:headers,body:dataString,auth:{'user':'username','pass':'password'}};functioncallback(error,response,body){if (!error&&response.statusCode==200){console.log(body);}}request(options,callback);
packagemainimport("fmt""io/ioutil""log""net/http""strings")funcmain(){client:=&http.Client{}vardata=strings.NewReader(`{"broadcast_message":{"attachment_urls":["https://cdn.cheapism.com/images/National_Park_Photos.2e16d0ba.fill-1440x605.png"],"body":"A broadcast message using all include and exclude fields","excluded_bot_assignment_ids":324,"excluded_order_ids":1,"excluded_profile_ids":770,"excluded_profile_list_ids":1,"excluded_shipping_label_ids":"101 102 103","excluded_tag_ids":62,"excluded_user_ids":[93487,38981],"included_bot_assignment_ids":324,"included_order_ids":1,"included_profile_ids":"770,8384,1938","included_profile_list_ids":1,"included_shipping_label_ids":101,"included_tag_ids":62,"included_user_ids":6299}}`)req,err:=http.NewRequest("POST","https://www.shout.app/api/v20230615/broadcast_messages/send_shout_message",data)iferr!=nil{log.Fatal(err)}req.SetBasicAuth("username","password")resp,err:=client.Do(req)iferr!=nil{log.Fatal(err)}deferresp.Body.Close()bodyText,err:=ioutil.ReadAll(resp.Body)iferr!=nil{log.Fatal(err)}fmt.Printf("%s\n",bodyText)}
using (var httpClient = new HttpClient())
{
    using (var request = new HttpRequestMessage(new HttpMethod("POST"), "https://www.shout.app/api/v20230615/broadcast_messages/send_shout_message"))
    {
        var base64authorization = Convert.ToBase64String(Encoding.ASCII.GetBytes("username:password"));
        request.Headers.TryAddWithoutValidation("Authorization", $"Basic {base64authorization}");


        request.Content = new StringContent({"broadcast_message":{"attachment_urls":["https://cdn.cheapism.com/images/National_Park_Photos.2e16d0ba.fill-1440x605.png"],"body":"A broadcast message using all include and exclude fields","excluded_bot_assignment_ids":324,"excluded_order_ids":1,"excluded_profile_ids":770,"excluded_profile_list_ids":1,"excluded_shipping_label_ids":"101 102 103","excluded_tag_ids":62,"excluded_user_ids":[93487,38981],"included_bot_assignment_ids":324,"included_order_ids":1,"included_profile_ids":"770,8384,1938","included_profile_list_ids":1,"included_shipping_label_ids":101,"included_tag_ids":62,"included_user_ids":6299}});
        request.Content.Headers.ContentType = MediaTypeHeaderValue.Parse("application/x-www-form-urlencoded");

        var response = await httpClient.SendAsync(request);
    }
}
Example Response
{"id":253,"body":"A broadcast message using all include and exclude fields","company_id":6,"created_at":"2023-06-22T20:58:53.722877-06:00","dont_mark_as_open":false,"object":"broadcast_message","outlet_type":"local","send_at":null,"updated_at":"2023-06-22T20:58:53.722877-06:00"}
Example Input
{"broadcast_message":{"body":"A direct message to all of my Shout Connect users who are Shout users","include_all_connect_users":true}}
curl https://www.shout.app/api/v20230615/broadcast_messages/send_shout_message -X POST \-u username:password \-d"{\"broadcast_message\":{\"body\":\"A direct message to all of my Shout Connect users who are Shout users\",\"include_all_connect_users\":true}}"
require'net/http'require'uri'require'json'uri=URI.parse("https://www.shout.app/api/v20230615/broadcast_messages/send_shout_message")uri.query={"broadcast_message":{"body":"A direct message to all of my Shout Connect users who are Shout users","include_all_connect_users":true}}request=Net::HTTP::Post.new(uri)request.basic_auth("username","password")request.body=JSON.dump({"broadcast_message":{"body":"A direct message to all of my Shout Connect users who are Shout users","include_all_connect_users":true}})req_options={use_ssl: uri.scheme=="https"}response=Net::HTTP.start(uri.hostname,uri.port,req_options)do|http|http.request(request)end# response.code# response.body
importrequestsfromrequests.structuresimportCaseInsensitiveDicturl="https://www.shout.app/api/v20230615/broadcast_messages/send_shout_message"headers={"Content-Type":"application/json",}data='{"broadcast_message":{"body":"A direct message to all of my Shout Connect users who are Shout users","include_all_connect_users":true}}'response=requests.post(url,headers=headers,data=data,auth=('username','password'))print(response.status_code)
$ch=curl_init();curl_setopt($ch,CURLOPT_URL,'https://www.shout.app/api/v20230615/broadcast_messages/send_shout_message');curl_setopt($ch,CURLOPT_RETURNTRANSFER,1);curl_setopt($ch,CURLOPT_POST,1);curl_setopt($ch,CURLOPT_POSTFIELDS,"{\"broadcast_message\":{\"body\":\"A direct message to all of my Shout Connect users who are Shout users\",\"include_all_connect_users\":true}}");$headers=array();$headers[]='Content-Type: application/x-www-form-urlencoded';curl_setopt($ch,CURLOPT_USERPWD,'username'.':'.'password');curl_setopt($ch,CURLOPT_HTTPHEADER,$headers);$result=curl_exec($ch);if(curl_errno($ch)){echo'Error:'.curl_error($ch);}curl_close($ch);
importjavax.xml.bind.DatatypeConverter;importjava.io.IOException;importjava.io.InputStream;importjava.io.OutputStreamWriter;importjava.net.HttpURLConnection;importjava.net.URL;importjava.util.Scanner;classMain{publicstaticvoidmain(String[]args)throwsIOException{URLurl=newURL("https://www.shout.app/api/v20230615/broadcast_messages/send_shout_message");HttpURLConnectionhttpConn=(HttpURLConnection)url.openConnection();httpConn.setRequestMethod("POST");byte[]message=("username:password").getBytes("UTF-8");StringbasicAuth=DatatypeConverter.printBase64Binary(message);httpConn.setRequestProperty("Authorization","Basic "+basicAuth);httpConn.setDoOutput(true);OutputStreamWriterwriter=newOutputStreamWriter(httpConn.getOutputStream());writer.write("{\"broadcast_message\":{\"body\":\"A direct message to all of my Shout Connect users who are Shout users\",\"include_all_connect_users\":true}}");writer.flush();writer.close();httpConn.getOutputStream().close();InputStreamresponseStream=httpConn.getResponseCode()/100==2?httpConn.getInputStream():httpConn.getErrorStream();Scanners=newScanner(responseStream).useDelimiter("\A");Stringresponse=s.hasNext()?s.next():"";System.out.println(response);}}
varrequest=require('request');varheaders={};vardataString='{"broadcast_message":{"body":"A direct message to all of my Shout Connect users who are Shout users","include_all_connect_users":true}}';varoptions={url:'https://www.shout.app/api/v20230615/broadcast_messages/send_shout_message',method:'POST',headers:headers,body:dataString,auth:{'user':'username','pass':'password'}};functioncallback(error,response,body){if (!error&&response.statusCode==200){console.log(body);}}request(options,callback);
packagemainimport("fmt""io/ioutil""log""net/http""strings")funcmain(){client:=&http.Client{}vardata=strings.NewReader(`{"broadcast_message":{"body":"A direct message to all of my Shout Connect users who are Shout users","include_all_connect_users":true}}`)req,err:=http.NewRequest("POST","https://www.shout.app/api/v20230615/broadcast_messages/send_shout_message",data)iferr!=nil{log.Fatal(err)}req.SetBasicAuth("username","password")resp,err:=client.Do(req)iferr!=nil{log.Fatal(err)}deferresp.Body.Close()bodyText,err:=ioutil.ReadAll(resp.Body)iferr!=nil{log.Fatal(err)}fmt.Printf("%s\n",bodyText)}
using (var httpClient = new HttpClient())
{
    using (var request = new HttpRequestMessage(new HttpMethod("POST"), "https://www.shout.app/api/v20230615/broadcast_messages/send_shout_message"))
    {
        var base64authorization = Convert.ToBase64String(Encoding.ASCII.GetBytes("username:password"));
        request.Headers.TryAddWithoutValidation("Authorization", $"Basic {base64authorization}");


        request.Content = new StringContent({"broadcast_message":{"body":"A direct message to all of my Shout Connect users who are Shout users","include_all_connect_users":true}});
        request.Content.Headers.ContentType = MediaTypeHeaderValue.Parse("application/x-www-form-urlencoded");

        var response = await httpClient.SendAsync(request);
    }
}
Example Response
{"id":254,"body":"A direct message to all of my Shout Connect users who are Shout users","company_id":6,"created_at":"2023-06-22T20:58:53.722877-06:00","dont_mark_as_open":false,"object":"broadcast_message","outlet_type":"local","send_at":null,"updated_at":"2023-06-22T20:58:53.722877-06:00"}
Example Input
{"broadcast_message":{"body":"Quiet direct message that doesn't open the recipient's conversation with your account","included_connect_ids":"1a2b3c","dont_mark_as_open":true}}
curl https://www.shout.app/api/v20230615/broadcast_messages/send_shout_message -X POST \-u username:password \-d"{\"broadcast_message\":{\"body\":\"Quiet direct message that doesn't open the recipient's conversation with your account\",\"included_connect_ids\":\"1a2b3c\",\"dont_mark_as_open\":true}}"
require'net/http'require'uri'require'json'uri=URI.parse("https://www.shout.app/api/v20230615/broadcast_messages/send_shout_message")uri.query={"broadcast_message":{"body":"Quiet direct message that doesn't open the recipient's conversation with your account","included_connect_ids":"1a2b3c","dont_mark_as_open":true}}request=Net::HTTP::Post.new(uri)request.basic_auth("username","password")request.body=JSON.dump({"broadcast_message":{"body":"Quiet direct message that doesn't open the recipient's conversation with your account","included_connect_ids":"1a2b3c","dont_mark_as_open":true}})req_options={use_ssl: uri.scheme=="https"}response=Net::HTTP.start(uri.hostname,uri.port,req_options)do|http|http.request(request)end# response.code# response.body
importrequestsfromrequests.structuresimportCaseInsensitiveDicturl="https://www.shout.app/api/v20230615/broadcast_messages/send_shout_message"headers={"Content-Type":"application/json",}data='{"broadcast_message":{"body":"Quiet direct message that doesn'topentherecipient's conversation with your account","included_connect_ids":"1a2b3c","dont_mark_as_open":true}}'response=requests.post(url,headers=headers,data=data,auth=('username','password'))print(response.status_code)
$ch=curl_init();curl_setopt($ch,CURLOPT_URL,'https://www.shout.app/api/v20230615/broadcast_messages/send_shout_message');curl_setopt($ch,CURLOPT_RETURNTRANSFER,1);curl_setopt($ch,CURLOPT_POST,1);curl_setopt($ch,CURLOPT_POSTFIELDS,"{\"broadcast_message\":{\"body\":\"Quiet direct message that doesn't open the recipient's conversation with your account\",\"included_connect_ids\":\"1a2b3c\",\"dont_mark_as_open\":true}}");$headers=array();$headers[]='Content-Type: application/x-www-form-urlencoded';curl_setopt($ch,CURLOPT_USERPWD,'username'.':'.'password');curl_setopt($ch,CURLOPT_HTTPHEADER,$headers);$result=curl_exec($ch);if(curl_errno($ch)){echo'Error:'.curl_error($ch);}curl_close($ch);
importjavax.xml.bind.DatatypeConverter;importjava.io.IOException;importjava.io.InputStream;importjava.io.OutputStreamWriter;importjava.net.HttpURLConnection;importjava.net.URL;importjava.util.Scanner;classMain{publicstaticvoidmain(String[]args)throwsIOException{URLurl=newURL("https://www.shout.app/api/v20230615/broadcast_messages/send_shout_message");HttpURLConnectionhttpConn=(HttpURLConnection)url.openConnection();httpConn.setRequestMethod("POST");byte[]message=("username:password").getBytes("UTF-8");StringbasicAuth=DatatypeConverter.printBase64Binary(message);httpConn.setRequestProperty("Authorization","Basic "+basicAuth);httpConn.setDoOutput(true);OutputStreamWriterwriter=newOutputStreamWriter(httpConn.getOutputStream());writer.write("{\"broadcast_message\":{\"body\":\"Quiet direct message that doesn't open the recipient's conversation with your account\",\"included_connect_ids\":\"1a2b3c\",\"dont_mark_as_open\":true}}");writer.flush();writer.close();httpConn.getOutputStream().close();InputStreamresponseStream=httpConn.getResponseCode()/100==2?httpConn.getInputStream():httpConn.getErrorStream();Scanners=newScanner(responseStream).useDelimiter("\A");Stringresponse=s.hasNext()?s.next():"";System.out.println(response);}}
varrequest=require('request');varheaders={};vardataString='{"broadcast_message":{"body":"Quiet direct message that doesn'topentherecipient's conversation with your account","included_connect_ids":"1a2b3c","dont_mark_as_open":true}}';varoptions={url:'https://www.shout.app/api/v20230615/broadcast_messages/send_shout_message',method:'POST',headers:headers,body:dataString,auth:{'user':'username','pass':'password'}};functioncallback(error,response,body){if (!error&&response.statusCode==200){console.log(body);}}request(options,callback);
packagemainimport("fmt""io/ioutil""log""net/http""strings")funcmain(){client:=&http.Client{}vardata=strings.NewReader(`{"broadcast_message":{"body":"Quiet direct message that doesn't open the recipient's conversation with your account","included_connect_ids":"1a2b3c","dont_mark_as_open":true}}`)req,err:=http.NewRequest("POST","https://www.shout.app/api/v20230615/broadcast_messages/send_shout_message",data)iferr!=nil{log.Fatal(err)}req.SetBasicAuth("username","password")resp,err:=client.Do(req)iferr!=nil{log.Fatal(err)}deferresp.Body.Close()bodyText,err:=ioutil.ReadAll(resp.Body)iferr!=nil{log.Fatal(err)}fmt.Printf("%s\n",bodyText)}
using (var httpClient = new HttpClient())
{
    using (var request = new HttpRequestMessage(new HttpMethod("POST"), "https://www.shout.app/api/v20230615/broadcast_messages/send_shout_message"))
    {
        var base64authorization = Convert.ToBase64String(Encoding.ASCII.GetBytes("username:password"));
        request.Headers.TryAddWithoutValidation("Authorization", $"Basic {base64authorization}");


        request.Content = new StringContent({"broadcast_message":{"body":"Quiet direct message that doesn't open the recipient's conversation with your account","included_connect_ids":"1a2b3c","dont_mark_as_open":true}});
        request.Content.Headers.ContentType = MediaTypeHeaderValue.Parse("application/x-www-form-urlencoded");

        var response = await httpClient.SendAsync(request);
    }
}
Example Response
{"id":255,"body":"Quiet direct message that doesn't open the recipient's conversation with your account","company_id":6,"created_at":"2023-06-22T20:58:53.722877-06:00","dont_mark_as_open":true,"object":"broadcast_message","outlet_type":"local","send_at":null,"updated_at":"2023-06-22T20:58:53.722877-06:00"}
Example Input
{"broadcast_message":{"body":"DM message a Shout user who is a Connect user","included_connect_ids":"1a2b3c","dont_mark_as_open":true}}
curl https://www.shout.app/api/v20230615/broadcast_messages/send_shout_message -X POST \-u username:password \-d"{\"broadcast_message\":{\"body\":\"DM message a Shout user who is a Connect user\",\"included_connect_ids\":\"1a2b3c\",\"dont_mark_as_open\":true}}"
require'net/http'require'uri'require'json'uri=URI.parse("https://www.shout.app/api/v20230615/broadcast_messages/send_shout_message")uri.query={"broadcast_message":{"body":"DM message a Shout user who is a Connect user","included_connect_ids":"1a2b3c","dont_mark_as_open":true}}request=Net::HTTP::Post.new(uri)request.basic_auth("username","password")request.body=JSON.dump({"broadcast_message":{"body":"DM message a Shout user who is a Connect user","included_connect_ids":"1a2b3c","dont_mark_as_open":true}})req_options={use_ssl: uri.scheme=="https"}response=Net::HTTP.start(uri.hostname,uri.port,req_options)do|http|http.request(request)end# response.code# response.body
importrequestsfromrequests.structuresimportCaseInsensitiveDicturl="https://www.shout.app/api/v20230615/broadcast_messages/send_shout_message"headers={"Content-Type":"application/json",}data='{"broadcast_message":{"body":"DM message a Shout user who is a Connect user","included_connect_ids":"1a2b3c","dont_mark_as_open":true}}'response=requests.post(url,headers=headers,data=data,auth=('username','password'))print(response.status_code)
$ch=curl_init();curl_setopt($ch,CURLOPT_URL,'https://www.shout.app/api/v20230615/broadcast_messages/send_shout_message');curl_setopt($ch,CURLOPT_RETURNTRANSFER,1);curl_setopt($ch,CURLOPT_POST,1);curl_setopt($ch,CURLOPT_POSTFIELDS,"{\"broadcast_message\":{\"body\":\"DM message a Shout user who is a Connect user\",\"included_connect_ids\":\"1a2b3c\",\"dont_mark_as_open\":true}}");$headers=array();$headers[]='Content-Type: application/x-www-form-urlencoded';curl_setopt($ch,CURLOPT_USERPWD,'username'.':'.'password');curl_setopt($ch,CURLOPT_HTTPHEADER,$headers);$result=curl_exec($ch);if(curl_errno($ch)){echo'Error:'.curl_error($ch);}curl_close($ch);
importjavax.xml.bind.DatatypeConverter;importjava.io.IOException;importjava.io.InputStream;importjava.io.OutputStreamWriter;importjava.net.HttpURLConnection;importjava.net.URL;importjava.util.Scanner;classMain{publicstaticvoidmain(String[]args)throwsIOException{URLurl=newURL("https://www.shout.app/api/v20230615/broadcast_messages/send_shout_message");HttpURLConnectionhttpConn=(HttpURLConnection)url.openConnection();httpConn.setRequestMethod("POST");byte[]message=("username:password").getBytes("UTF-8");StringbasicAuth=DatatypeConverter.printBase64Binary(message);httpConn.setRequestProperty("Authorization","Basic "+basicAuth);httpConn.setDoOutput(true);OutputStreamWriterwriter=newOutputStreamWriter(httpConn.getOutputStream());writer.write("{\"broadcast_message\":{\"body\":\"DM message a Shout user who is a Connect user\",\"included_connect_ids\":\"1a2b3c\",\"dont_mark_as_open\":true}}");writer.flush();writer.close();httpConn.getOutputStream().close();InputStreamresponseStream=httpConn.getResponseCode()/100==2?httpConn.getInputStream():httpConn.getErrorStream();Scanners=newScanner(responseStream).useDelimiter("\A");Stringresponse=s.hasNext()?s.next():"";System.out.println(response);}}
varrequest=require('request');varheaders={};vardataString='{"broadcast_message":{"body":"DM message a Shout user who is a Connect user","included_connect_ids":"1a2b3c","dont_mark_as_open":true}}';varoptions={url:'https://www.shout.app/api/v20230615/broadcast_messages/send_shout_message',method:'POST',headers:headers,body:dataString,auth:{'user':'username','pass':'password'}};functioncallback(error,response,body){if (!error&&response.statusCode==200){console.log(body);}}request(options,callback);
packagemainimport("fmt""io/ioutil""log""net/http""strings")funcmain(){client:=&http.Client{}vardata=strings.NewReader(`{"broadcast_message":{"body":"DM message a Shout user who is a Connect user","included_connect_ids":"1a2b3c","dont_mark_as_open":true}}`)req,err:=http.NewRequest("POST","https://www.shout.app/api/v20230615/broadcast_messages/send_shout_message",data)iferr!=nil{log.Fatal(err)}req.SetBasicAuth("username","password")resp,err:=client.Do(req)iferr!=nil{log.Fatal(err)}deferresp.Body.Close()bodyText,err:=ioutil.ReadAll(resp.Body)iferr!=nil{log.Fatal(err)}fmt.Printf("%s\n",bodyText)}
using (var httpClient = new HttpClient())
{
    using (var request = new HttpRequestMessage(new HttpMethod("POST"), "https://www.shout.app/api/v20230615/broadcast_messages/send_shout_message"))
    {
        var base64authorization = Convert.ToBase64String(Encoding.ASCII.GetBytes("username:password"));
        request.Headers.TryAddWithoutValidation("Authorization", $"Basic {base64authorization}");


        request.Content = new StringContent({"broadcast_message":{"body":"DM message a Shout user who is a Connect user","included_connect_ids":"1a2b3c","dont_mark_as_open":true}});
        request.Content.Headers.ContentType = MediaTypeHeaderValue.Parse("application/x-www-form-urlencoded");

        var response = await httpClient.SendAsync(request);
    }
}
Example Response
{"id":256,"body":"DM message a Shout user who is a Connect user","company_id":6,"created_at":"2023-06-22T20:58:53.722877-06:00","dont_mark_as_open":true,"object":"broadcast_message","outlet_type":"local","send_at":null,"updated_at":"2023-06-22T20:58:53.722877-06:00"}