Enable Connect Orders & Text Alerts
The simplest way to send order and text alerts from affiliates and distributors
Shout Connect is the easiest way for any organization to send get started sending order and text alerts from an affiliator or distributor directly to a customer.
Contents
How Shout Connect Orders and Text Alerts Work
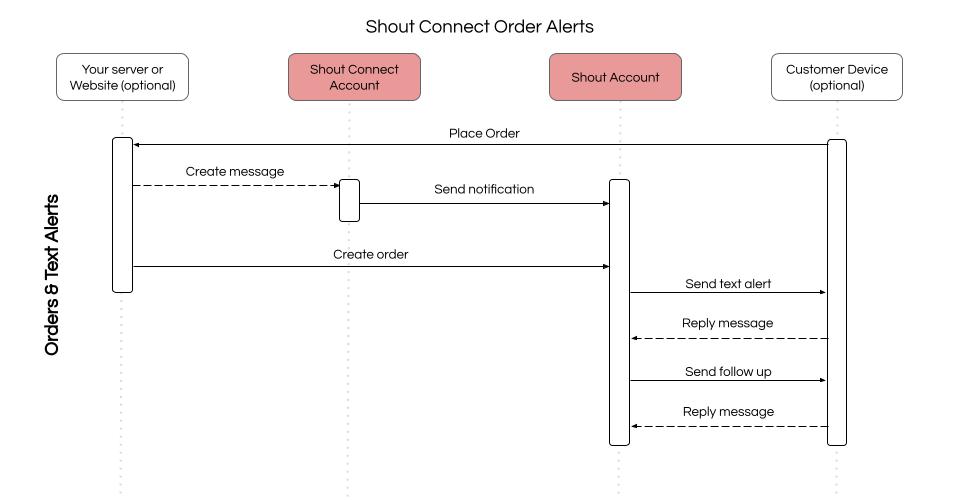
With many affiliate and independent distributor business models, it can be difficult to standardize simple tasks such as sending text and shipping alerts without providing a confusing experience for customers. Shout Connect overcomes these challenges by sending these alerts from the affiliate or sales team member's Shout account, ensuring that the affiliate becomes the customer's single point of contact for reorders, support, and fulfillment information. Shout Connect allows you to send affiliates a notification and create orders in their account when a customer places an order. The managed Shout account then delivers the text alerts and followups directly to the customer from the affiliate's account.
Before You Get Started
If you've skipped over the preceding Shout guides ( no worries, we don't always read everything first either 😉), here are a few things that you'll want do before you open up your code and enable Connect Orders and Text Alerts:
- Make sure you or your organization has Shout Connect enabled on their account. If you're not sure, login to your Shout account and navigate to Settings > Services > Shout Connect. If you aren't able to access the Shout Connect page, reach out to Shout support (for production environments) or Shout Developers (for development environments) and ask to have it enabled for your organization first.
- Check out our guide for setting up a development environment for easy testing and troubleshooting. You'll need api credentials.
- Make sure that you have at least one other shout account that has authorized your Shout Connect account. You can read more about this in the Shout Connect Overview.
Step-By-Step Enabling Connect Orders and Text Alerts
There are four steps to enabling Connect Orders and Text Alerts. These steps are explained in detail with code examples below.
- Add an order to a connected account when an order is placed
- (Optional) Notify the connected account that an order has been added
- (Optional) Backfill historical orders you'd like affiliates or distributors to have reference information for
- (Optional) Customize the plugin and simple connect page to provide default Order Alert text message to send and allow affiliates and distributors to enable order alerts with the integration
Step 1: Add an order to a connected account when an order is placed
When a customer places an order with your organization, the first step to sending them a text alert from an affiliate or distributor is to add the order details to the affiliate's connected Shout account. Shout Connect makes this very simple and straight forward:
- Construct the payload for the Order Create api call.
- Include the
X-Shout-Connect-IDORX-Shout-User-Idspecial headers along with the API credentials header in your call. Check out the documentation here for more information. - Post to the Orders Create endpoint.
Language
Example Input
{
  "order": {
    "invoiced_at": "now",
    "paid_at": "now",
    "description": "Order from Ecommerce Site",
    "profile_name": "Janet Smith",
    "profile_phone_number": "(801) 555-6788",
    "profile_shipping_address_raw": "1 E Center St, Provo, UT 84606",
    "line_items": [
      {
        "name": "Tank Top",
        "each_price_cents": 3500,
        "quantity": 2,
        "price_cents": 7000
      },
      {
        "name": "T-Shirt",
        "each_price_cents": 4900,
        "quantity": 1,
        "price_cents": 4900
      }
    ],
    "total_cents": 16800,
    "fail_if_connect_orders_not_enabled": true
  }
}Example Response
{
  "id": 234868,
  "company_id": 8109,
  "created_at": "2023-06-21T22:06:02.799121-06:00",
  "description": "Order from Ecommerce Site",
  "dont_trigger_auto_actions": false,
  "integration": "connect",
  "invoiced_at": "2023-06-21T22:06:02.775344-06:00",
  "invoiced_source": "connect",
  "line_items": [
    {
      "each_price": "$35.00",
      "each_price_cents": 3500,
      "each_price_currency": "USD",
      "name": "Tank Top",
      "object": "order_line_item",
      "price": "$70.00",
      "price_cents": 7000,
      "price_currency": "USD",
      "quantity": 2.0
    },
    {
      "each_price": "$49.00",
      "each_price_cents": 4900,
      "each_price_currency": "USD",
      "name": "T-Shirt",
      "object": "order_line_item",
      "price": "$49.00",
      "price_cents": 4900,
      "price_currency": "USD",
      "quantity": 1.0
    }
  ],
  "metadata": null,
  "notified_profile_of_paid_invoice_at": null,
  "object": "order",
  "paid_at": "2023-06-21T22:06:02.775368-06:00",
  "paid_source": "connect",
  "profile_email": null,
  "profile_id": 6645902,
  "profile_name": "Janet Smith",
  "profile_phone_number": "+18015556788",
  "profile_shipping_address_raw": "1 E Center St, Provo, UT 84606",
  "reference_id": null,
  "refunded_at": null,
  "refunded_source": null,
  "shipped_at": null,
  "shipped_source": null,
  "status": "paid",
  "total": "$168.00",
  "total_cents": 16800,
  "total_currency": "USD",
  "updated_at": "2023-06-21T22:06:02.799121-06:00"
}
Step 2: Notify the connected account that an order has been added
Although optional, it's best practice to notify affiliates and distributors that you've added an order to their account. This ensures that they are aware that alerts will be sent (if they have them enabled) and allows them to be prepared to handle support and fulfillment questions. Shout Connect makes sending this notificaiton very simple. You'll simply post a message to the /messages/send_connect_notification with the connect_id or shout user_id. Here's a simple example:
- Construct the payload for the Send Shout Notification api call.
- Include the API credentials header in your call. Check out the documentation here for more information.
- Post to the Send Connect Notification or Send Broadcast Message endpoint.
Language
Step 3: Backfill Historical Orders
Although optional, it's very helpful to add historical orders to connected accounts so that affiliates and distributors can easily identify loyal customers and repeat purchases. This also makes it easier for them to handle support and fulfillment questions and improve their marketing and followups. Shout Connect makes backfilling historical orders very simple. You'll simply create an order just as you did in Step 1 above with an additional parameter in the payload of dont_trigger_auto_actions so that the order doesn't send out real time text alerts. Here's an example:
- Construct the payload for the Order Create api call.
- Include the
X-Shout-Connect-IDORX-Shout-User-Idspecial headers along with the API credentials header in your call. Check out the documentation here for more information. - Post to the Orders Create endpoint.
Language
Example Input
{
  "order": {
    "created_at": "2021-04-09T12:00:00.123456-06:00",
    "invoiced_at": "2023-01-03",
    "paid_at": "2023-01-03",
    "description": "Order from Ecommerce Site",
    "profile_name": "Janet Smith",
    "profile_phone_number": "(801) 555-6788",
    "profile_shipping_address_raw": "1 E Center St, Provo, UT 84606",
    "line_items": [
      {
        "name": "Tank Top",
        "each_price_cents": 3500,
        "quantity": 2,
        "price_cents": 7000
      },
      {
        "name": "T-Shirt",
        "each_price_cents": 4900,
        "quantity": 1,
        "price_cents": 4900
      }
    ],
    "total_cents": 16800,
    "fail_if_connect_orders_not_enabled": true,
    "dont_trigger_auto_actions": true
  }
}Step 4: Customize the default order alert text and enable the feature in your Connect Plugin and Simple Connect Page
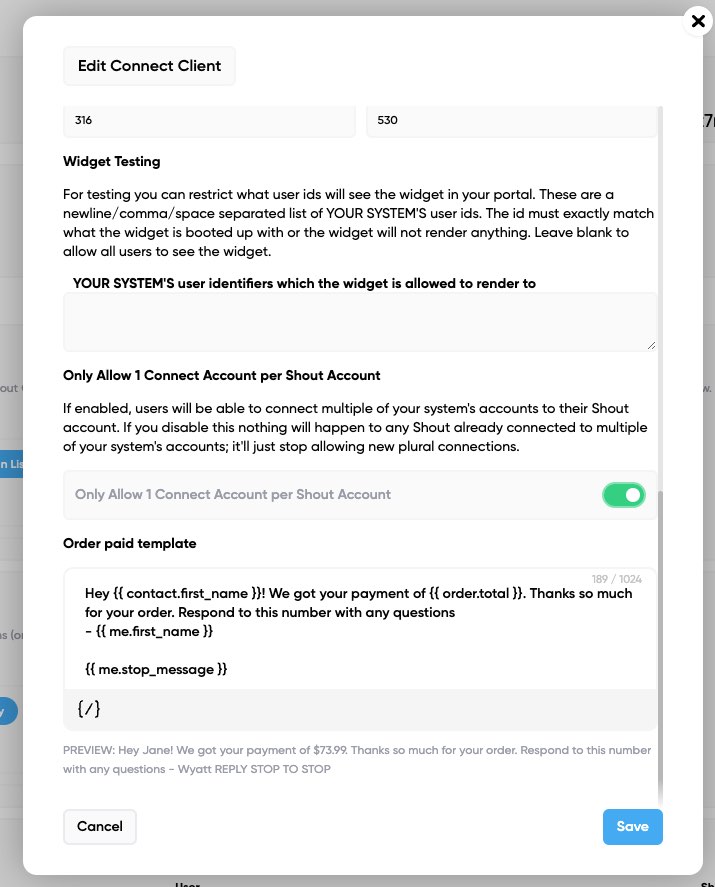
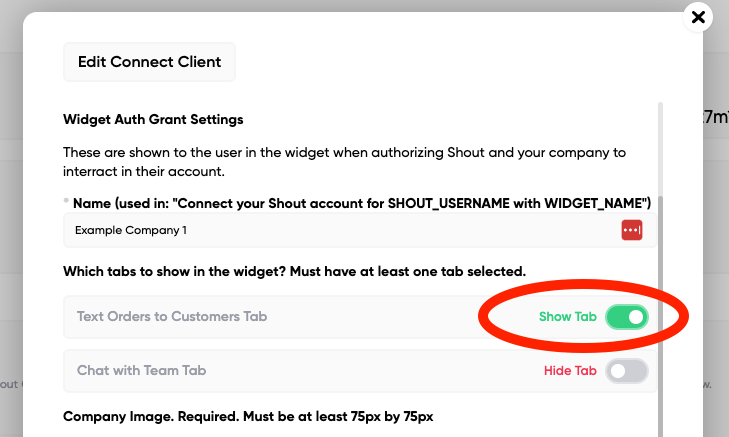
Most new affiliates and distributors will take some time to become familiar with your products and their business tools, so it's best practice to customize the default order text alert that their Shout account will use when they enable the Connect Account integration. Shout makes it easy to customize this default Order Text alert:
- Login to your Shout account and navigate to your Shout Connect services Page by clicking on Settings > Services > Shout Connect. If the page is not visible contact Shout support to have it enabled on your account.
- Click the "Manage" button and then click Edit to open the settings modal
- Click the "Text Orders to Customers Tab" switch to the "On" position
- Scroll down and edit the "Order paid template" and click "Save"